Author Archives: Heidi-ann

VIM – The CompSci Classic

Learning to escape VIM

I have a confession, the first I launched vim I could not even work out how to quit it so I took the lazy way out and just closed the terminal. This put me right off vim for quite a while. Now its time to really try to learn it.

Vim has two modes: insert and normal, when you launch vim it will go straight into normal mode, from normal mode type i to switch to insert mode and then press ESC to return back to normal mode.

GOLDEN SECRET 1: To exit VIM, enter :q in the normal mode

Normal mode basics 
You can delete the character under the cursor using x and using :w to save. To cut the current line use dd, this will delete the text on the current line and also delete the line itself, the cursor will move to the next line, which is now where the original line was. To copy the current line use yy. Now to paste the recently cut line, use p  to insert the text onto the line below where the cursor currently is or P to insert text before cursor.

Instead of the arrow keys, you can make use of hjkl to move the cursor, but personal I prefer to use the arrow keys

Entering Insert mode
So far we have entered insert mode using i, there are some alternative ways to enter insert mode, which allow you to move to insert mode and perform a useful operation in one key stoke, some of the alternative methods to enter insert mode are:

  • a – insert mode and move cursor back one charactor
  • o – insert mode and insert a new line after the current one
  • O – insert mode and insert a new line before the current one
  • cw – insert mode and delete the current word
GOLDEN SECRET 2: Insert mode has auto complete, use Ctrl-n to activate

Moving around normal mode
As well as using the arrow keys (or hjkl) to navigate around normal mode, there are plenty of useful extra shortcuts for navigating around. 0 jumps to first character in the row and $ goes to the last character in the row. ^ jumps to the first non-blank character of a line and g_  goes to the last non_blank character of line.

To search for a particular work or character, use / and enter search term. This will move the cursor to the next occurrence of the search term after the cursor, so to search for the first occurrence of a term in a file, put the cursor at the start of the file and then use / to search for the term.

To jump to the start of the next word use w and to go to end of this word use e, when  a word is composed of letters and underscores only, if you want to word to include special characters use W and E instead

GOLDEN SECRET 3: % means go to corresponding (, { and [

Text editor basics
u is used to undo and Crtl-r to redo. To open a file use :e , :w to save, :saveas , 😡 to save and quit. :q! to quit without saving. . will repeat last   command and N will repeat the command N number of times. NG goes to line N and G is go to last line


GOLDEN SECRET 4: * means to next occurrence of word under cursor and # means go to previous

Fault Tolerance comes to Twitter in the form of Twimight

Making twitter fault tolerance may not seem like a priority at first thought, I mean surely in the unlikely event of the network failure, those 17 year of girls can will just have to learn to wait before they can tweet about there new jimmy shoes.

But if you consider further the situations in which network failure is likely to occur such as natural disaster, this is when twitter is needed the most. Here is an xkcd to illustrate the point

Seismic WavesIts difficult, particularly if you didn’t grow up with twitter to understand why keeping social network alive in the event of a disaster is so important. But like it or not, twitter is just as essential in some peoples live than other (more traditional) communications form such as text messaging or TV broadcasts. In fact, it could be argued that since scarcity of information is often a problem for individuals in a disaster, the broadcast properties of twitter, make it potential more useful than  uni cast text messaging or voice calls.

TWIMIGHT

The application to which has introduced this ‘disaster mode’ to twitter is called Twimight, its a open source twitter application with a couple of very interesting features. I’ve going to test out the application on my nexus 7.

The basic interface of the application is very similar to that of the standard twitter application but an exploration of the overflow icon highlights a range of features, that could be particularly useful in a disaster.

The basic idea of how this application aims to enable connectivity in a disaster situation is as follows:

  • Android device users install the application and get there friends to do the same
  • Bluetooth is used to pair your android device with your friends android devices
  • Disaster occurs so network connection is lost and the user enables the ‘Disaster Mode’ within the application which turns on bluetooth in an always discoverable mode
  • The user tweets despite the lack of a network connection
  • The tweet is send (via bluetooth) to friends within range
  • The disaster is over and the network connection is restored
  • Tweets are automatically posted to the web

ANDROID SENSOR TWITTETH

Twimight also support a plug-in called android-sensor-twitteth

TDS COMMUNICATIONS

The twitter disaster server is used to collect user activity and environment data

THE PLATFORM

In case of a disaster, individuals do not want let any other peice of hardware to carry around but given that 3/4 of the world’s population now have access to a mobile phone and that twitter now has 500 million users, mobile twitter access has the potential to be a powerful force for good.

The UX is designed such that its simple to use in a stressful situation, with the user enabling the ‘disaster mode’ in the application with a simple check box (though this box is a little harder to find than I would ideally like)

USE OF BLUETOOTH

Before Bluetooth can be used for the automatic spreading of tweeter messages, the devices must be paired, those potential irritating to the user, this is essential to allow the application to make up of the bluetooth protocol.

Once the user has enabled ‘Disaster Mode’ the application enables bluetooth, scanning takes place every  2 mins +- 20 sec

IMPACT ON BATTERY LIFE

Power consumption is important considation for all mobile applications, in this case it is particularly important as its more unlikely that users will have access to pwer supplies and suitable chargers. In ‘disaster mode’ the use of bluetooth much therefore be considered carefully. Bluetooth scanning time need be as high as possible to increase the speed of the transition of tweet, whilst using minimal battery life. The power saving heretics for Twimight are set so that the scanning interval is  reduced when battery is less than 50 % and scanning is stopped when battery is less than 30 %.

CRITICAL MASS

This application like many others, we be almost unless to individuals unless the number of devices that the application is install on reaches a critical number such that in the case of a disaster, there is at least one individuals within bluetooth transmitting distance with the application installed

This application will not be able to reach this critical mass, because individuals will not have the foresight to install such an application, “just in case” they were to need the disaster mode it provides.

Consider instead, the hypothetical case that twitter was to adopt such a “disaster mode” into its own supported mobile application.

The official twitter application has 578,194 downloads from the play store and 500 million activated android devices. So twitter and android are powerful platforms but with a typical bluetooth range of 10 m and the requirement for pair devices, is bluetooth really the best wireless protocol for this use

CASE STUDY : TWITTER & GREAT EAST JAPAN EARTHQUAKE

Tsukuba is a city of 200,000 located in Ibaraki Prefecture, Japan. Tsukuda lost electricity, communication networks and water immediately after the Great East Japan Earthquake of March 2011. The lack of power meant that smart phones became key devices for communication. Muneo Kaigo has written an excellent Keio Communication Review, examining the use of twitter in Tsukuda in the 7 days following the earthquake and I thoroughly recommend it

SOURCES

twimight hosting on google code –  code.google.com/p/twimight/
twimight unofficial application location –  twimight.googlecode.com/files/twimight_0.9.2.apk
android-sernsor-twitteth hosting on google code – code.google.com/p/android-sensor-twitteth/
the paper – people.ee.ethz.ch/~hossmath/papers/extremecom11_twimight.pdf
presentation from Extremecom 2011 – www.slideshare.net/thossmann/twitter-in-disaster-mode-extremecom-2011 
Keio Communication Review No. 34, 2012 – Social Media Usage During Disasters
and Social Capital: Twitter and the Great East Japan Earthquake –

Heidi-ann

October 11, 2012

I’m off to Aberdeen to demo Signposts at the All Hands Digital Economy Conference, this is my first conference and I’m very existed 😀 😀

DNSSEC – A basic Intro

This article aims to not just explain how DNSSEC work but why the protocols are designed the way that they are. I will begin with a simple mental model of public-key cryptography, then I highlight issues with scheme described so far and add complexity to fix issues as I highlight them. I finish the article with a simplified model of DNSSEC and a range of problems/question that I hope to explore in the next article.

DNSSEC is a collection of IETF specifications for securing DNS data. It is a set of extensions to DNS which provide to DNS resolvers with:

  • origin authentication of DNS data
  • authenticated denial of existence
  • data integrity

It does not provide the DNS resolvers with:

  • availability
  • confidentiality, DNSSEC results are not encrypted
  • protection from user mistakes/assumptions

DNSSEC aims to adds security to DNS, while maintaining backwards compatibility.

RFC 3833

DNSSEC protects DNS resolvers from forged DNS data, by digitally signing all DNSSEC replies. The DNS resolver is then able to check if the information it receives is identical to that information on the authoritative DNS server.

DNSSEC can also protect information such as cryptographic certificates stored in CERT records in DNS.

RFC 4398

RFC 4367

Negative article on DNSSEC

DNSSEC-bis is the name of the DNSSEC specification and the related RFCs are
4033 introduction & requirements, 4034 resource records for DNSSEC and 4035 on protocol modifications.

Public-key cryptography is the use of two keys, one public and one private to encrypt and decrypt a message. A message before encryption is referred to as plain text and a message after encryption is referred to as cipher text.

Public-key cryptography can be used to provide confidentiality or authentication.

To provide confidentiality, the public key is used for encryption so anyone can write a message but only the intended recipient has the private key which is used for decryption, so the only person who can decrypt the message is intended recipient.

To provide origin authentication, the private key is used for encryption so the only person who can send an encrypted message is the intended source. Then the public key is used for decryption so anyone can read the message, provided it was written by the intended source.

Figure 1 – How public key cryptography can be used to provide authentication or confidentiality

DNSSEC works by digitally signing the results of DNS look-ups using public-key cryptography. It uses public-key cryptography to provide authentication not confidentiality. This means that private key is used for encryption and the public key is used for decryption. So when a DNS resolver makes a DNSSEC query, then the response will be signed by the correct information source and then the DNS resolver will use the public key to decrypt the response, knowing the response is reliable as it was definitely send by the intended source.

So that’s the problem solved, the DNS responses will be encrypted by correct source and then all the DNS resolvers will decryption the responses using the public key. This ensures that the response was sent by the correct source so it provides source authentication as well an data integrity as it was signed using a private key.

Except that this model completely ignores the details of how DNS actually generates the replies to DNS query and what exactly is the “intended source” in this context.

So now I want to explain why the basic public-key cryptography scheme that I outline is not sufficient to provide authentication.

The cryptography scheme aimed to provide authentication between the DNS resolver and the source of the DNS response, but it didn’t consider the details of how this DNS response was generated.

The actually answer is that the “intended source” in DNS is an Authoritative Name Server, There are many authoritative name server forming a distributed database, each authoritative name server responses to a specific subset of the DNS queries.

The DNS resolver needs to locate the relevant authoritative name server, this is achieved through a chain of domain name servers, either recursively, iteratively or a hybrid of them both.

To generate the response to a DNS query for the DNS resolver, there are a series of request-replies. So for DNSSEC to meet its primary goal of providing authenticated responses, there needs to be authentication throughout the chain between the DNS resolver and the intended source, which is the authoritative name server.  When a DNSSEC enabled DNS resolver gets a response then it can use the public key to check that it was encrypted by the authoritative name server.

So now we have fixed the problem … Actually not

This solution would require that all DNS resolvers change because all DNS resolvers need to decrypt the DNSSEC response using the public key to get the the normal DNS response. Given that DNSSEC nees to be backwards compatible with DNS, this means we need to alter the above scheme.

So instead of encrypting and decrypting the whole DNS response, why don’t we add some text to the DNS response as another resource record and then encrypt and decrypt that text instead. This means that DNS resolvers that are not DNSSEC compatible can simply ignore the extra resource records. This extra bit of information therefore acts as a digital signature. This is actually used in DNSSEC and the new resource record is called RRSIG.

Now we have DNS record with an extra resource record called RRSIG, the authoritative name server has the private key and the DNS resolver use the public key to check that the DNS information received was from an authoritative name server. But where do the DNS resolvers get the public key from ?

A simple idea would be to have a single server with all public keys on, then all DNSSEC enabled resolvers could just request the public key from the central server. This is fundamentally flawed as its a centralized system which would completely defeat the purpose of DNS, which is to act as a distributed system.

Therefore we need a distributed system of our own to get the public keys to the DNSSEC enabled resolvers, why not use a system like DNS or even DNSSEC ?

DNSSEC gets the public key, from the authoritative name server to the DNSSEC enabled resolver by introducing another new resource record called DNSKEY. This has the public key in it so that the DNS resolver can use it to verify the RRSIG.

Done ? Nope of course not …

So its easy to assume that we finished here but as we developed the scheme we have actually introduced new issues, for example we have lost any data integrity. Its easy for a 3rd party to intersect a DNS query, change the data in the resources and set it forward to its destination. The DNSSEC enabled resolver would be nun the wiser, as the response to the DNSSEC query is still correctly signed and will have the correct RRSIG.

We can fix they by making the plain text in the RRSIG, a hash of the original message. This means that if the messaged is changed in transit then the DNS resolver will detect it because after decrypting the RRSIG text and hashing the other resource records, the results will no longer be the same because the hash generated from the DNSSEC response will be different to the RRSIG one as the text has been changed.

Lets review where we have got to so far…

DNSSEC uses public-key cryptography to provide authentication and data integrity between authoritative name servers and DNS resolvers. It does this using two new resource records, RRSIG and DNSKEY.

The authoritative name server hashes the RRs and then uses a private key to encode this hash, the result is placed in the RRSIG record and the public key is placed in the DNSKEY record. Then the DNS response moves though a chain of domain name servers to the DNS resolver. If the DNS resolver supports DNSSEC then it will use the public key in the DNSKEY record to decrypt the RRSIG, this will give a hash of the other RRs, the resolver can then hash the other RRs and compare the results.

So what is this public-key cryptography algorithm that DNSSEC uses and whats going to happen if its broken in the future ?

DNSSEC doesn’t use a specific algorithm. Both DNSKEY and RRSIG have a 8 bit number, which corresponds to the algorithm used, details of with values correspond to which algorithms is available here

This scheme has a big problem though…

Consider the following situation, I am an evil 3rd party would wants to return the incorrect DNS respond to a (DNSSEC enable) DNS resolver :

  1. The (DNSSEC enable) DNS resolver places a DNS request for www.google.com
  2. I spot this and I want to send a reply to this DNS request that will not be from the authoritative name server, managed by Google
  3. So I’m going to make my own response and make it appear as its has comes from the authoritative name server
  4. I create RR with the incorrect information and I then come up with my own public and private key pair, using the private key to encrypt the hash in the RRSIG and then place the public key in the DNSKEY record
  5. The DNS resolver then decrypts the RRSIG record using the key in the DNSKEY and checks that its a hash of the other RR records
  6. The DNS resolver believes that the response is from the authoritative name server at google

The problem is the above situation is that although the RRSIG and DNSKEY resource records aim to authenticate the other resource records, there is nothing to prevent a 3rd party changing the RRSIG and the DNSKEY. What we need is a method of authenticating the DNSKEY.

If we assume for a moment that the DNSKEY is authenticated, then a (DNSSEC enable) DNS resolver will be able to detect if the other resource records have been changed. As the decrypted RRSIG will not be a hash of the other resource records. If a evil 3rd party also when tries to also change the RRSIG value, so that the decrypted RRSIG is a hash of the changes made, then they can do this only if they know the private key. But they do not know the private key used and they cannot replace the public/private key pair as we have assumed that the DNSKEY is authenticated

So how can we ensure that the DNSKEY is from the authoritative name server ?

DNSSEC works around this is by signing the DNS replies at each step in the chain of response and reply. So when a domain name server queries another domain name server, not only is the expected result returned but also a flag indicating if that zone used DNSSEC and if it does it includes a hash of the DNSKEY record stored in a record called DS.

So far we have introduced 3 new resource records to DNS:

  • RRSIG – a hash of the other RRs that is encrypt using the private key by the authoritative name server
  • DNSKEY – the public key associated with the private key used to encrypt the RRSIG, a DNS resolver then using this public key to decypt the RRSIG and check that the plaintext is a hash of the other RRs
  • DS – a hash of the DNSKEY used in the zone that the DNS resolver is about to query so that the resolver can check that the response from the next name server query has not had the DNSKEY altered because it can check the DNSKEY received with DS received from the last name server.

This hash is then used when the name server queries the zone, as the DNSKEY returned hashed should match the DS RR from the previous query. If the response doesn’t include a DNSSEC RR or the DNSSEC hashed is not the same as the previously returned DS RR, then the integrity of the data has been comprised.
Example
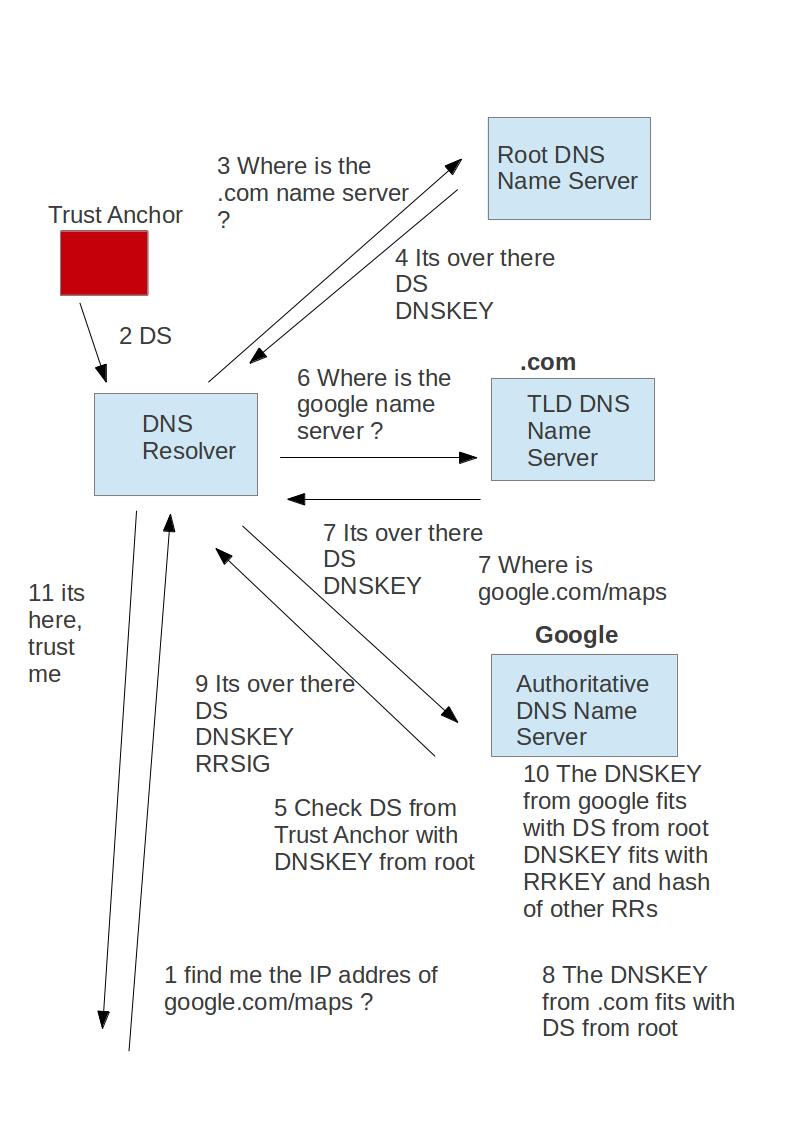
This diagram attempt to demonstrate how the chain of DS and DNSKEY allows use to assume that the DNSKEY has not been tampered with. In this example, a DNS resolver queries the root DNS name server and its returned with the normal DNS response as well as a DS resource record. This DS RR is a hash of the DNSKEY that will be returned then the next DNS request is made. The DNS resolver then queries a TLD name server, this returns the normal DNS response as well as a DNSKEY and another DS. Now the DNS resolver can check that the response was from the TLD name server by checking that the DS that is recieved prevously from the root DNS name server is a hash of the DNSKEY. The DNS resolver can now contiune as it has the DS, which is a hash of the DNSKEY that should be returned by the next name server

Figure 2 – DNSSEC chain of trust created using corresponding DS and DNSKEY RRs, this assumes that the response from the root DNS can be trusted


How does the DNS resolver know that it can trust the result from the root DNS server ?

In the above example we cant guarantee that response from the root DNS server is actually from the root DNS server, this is why we introduce a trust anchor

Figure 3 – chain of trust between a trush anchor and the authoriatative name server using a series of DS and RRSIG resource records

But this appears just to move the problem, how can we trust the trust anchor ?
We get the DS resource record using a different method where we don’t need to authenticate the origin as we know that the message can’t have been intercepted (i.e. via the operating system)

As you can see we have created a chain of trust using a series of corresponding DS records and DNSKEYs, this means that when we reach the authoriative DNS name server, we know that we can trust the DNSKEY and that is will not have been tampered with.

There is a fun website here, which provides information on the chain of trust.

Thing to consider in the next article:

  • What’s the difference between a validating and non-validating stud resolver, which is better ?
  • DNSSEC also introduces NSEC and NSEC3 resource records, what are these used for ?
  • DNSSEC requires use of the “DO” flag in  EDNS, why don’t the DNS resolvers just ignore the RRSIG. DNSKEY and DS resource records ?
  • What happens if the authoriative name server do not support DNSSEC, how does the resolver know the difference between DNS response from an authoriative name server that don’t use DNSSEC and a attach where the evil 3rd party tries to pretent the the authoriative name server dose not use DNSSEC
  • How exactly goes the trust anchor get the DS for DNS root, what happens if the root DNS needs to update the DNSKEY and therefore the DS record in the trust anchor, if for example the cyptographic algorithm is broken
  • How does a authoriative name server prove that an DNS entery don’t exist ?
  • In July 2010, the DNSSEC was added to the root DNS, could you use DNSSEC before the root DNS support DNSEC if all other name server and the resolver supported DNSSEC ? DNS Lookaside validation ?
  • What happens when a name server between the root and authoriate name server doesnt support DNSSEC but the other name server involved do ?
  • Why are there additional timestamps in the RRSIG to limit the time that the signiture is valid ?
  • Why are these timestamps absolute not relative like TTLs ?
  • How are new keys implemented and what about the caching?
  • Whats zome emuation and how can it be dealt with ?

Notes on "A Close Examination of Performance and Power Characteristics of 4G LTE Networks"! – Pt1

These are my notes on “A Close Examination of Performance and Power
Characteristics of 4G LTE Networks” which can be found here

4G is as the name suggests, the forth generation of mobile communication standards. There are currently two competing technologies, Mobile WiMAX and LTE. Long term evolution (LTE) is the technology that this paper considers.

4G Test Android Application

The team designed an android application called 4GTest. It is available in the Play store here. The application measures the network performance including latency, download speed and upload speed.

The application description claim that the results produced by this application are more accurate that any other test using single-threaded TCP tests.

I tested the application on an old HTC Magic but I couldn’t get the application to recognize my internet connection. The application is not compatible with the Nexus 7.

Overall Results/ Conclusions

The abstract states that “LTE generally has significantly higher downlink and uplink throughput than 3G and even WiFi, with a median value of 13Mbps and 6Mbps, respectively”. I am not sure why the median value has been quoted here instead of the mean value (if you know why, please comment below).

The data set for the study was 20 smart phone users over 5 months, this seems like a fairly limited sample size.

The power model of the LTE network, had a less than 6% error rate. It was found that LTE was less power efficient than WiFi and 3G. Testing of android applications highlighted that the device power is now becoming a bottleneck, instead of network performance, compared to 3G.

Long term evolution
LTE aims to enhance the Universal Terrestrial Radio Access Network, more commonly known as 3G. LTE is commercially avaliable but is not yet wide spread. The targeted user throughput is 100Mbps for downlink and 50Mbps for uplink. These targets are distinctly different to median values of 13Mbps and 6Mbps, respectively previously quoted.

User-plane latency is defined as the one-way transit time between the availability of a packet at the IP layer (the network layer) at the source and the availability of this packet at the IP layer (the network layer) at the destination. This definition means that user-plane latency includes the delay introduced by associated protocols. Since the delay is measured from network layer to network layer, we do not need to consider the delay introduced by the application layer or transport layer.

LTE can be compared to other networks such as Wi-FI and 3G by comparing network statistic such as bit rate, latency, user equipment (UE) power saving etc..

LTE uses Orthogonal Frequency Division Multiplex (OFDM) technology.
OFDM is based on FDM, but FDM wastes bandwidth as you need to leave bandwidth free between different carriers to stop the signals from interfering with each other. OFDM allows the carriers to be more closely spaced together so less bandwidth is wasted.

But OFDM is less power efficient as its more complex and requires linear amplification. To save power, LTE up ink uses a special implementation of OFDM called SC-FDMC.

Discontinuous reception (DRX) is also employed to reduce UE power consumption by some existing mobile technologies. LTE supports DRX. DRX is configured on a per UE basis and allows tradeoff to be made between power saving, delay and signalling overhead.

This study differs from previous ones since it doesn’t use either total on time or simplified LTE. Furthermore it uses real user traces instead of synthetic packets. UMICH refers to the real user data set of 20 smartphone users over 5 months, this data consists of user traces from Wi-Fi and 3G networks but not from LTE networks. So instead Wi-Fi traces are feed into the LTE model simulation framework, Wi-Fi traces were chosen over 3G as the RRT of Wi-Fi is more similar to that of LTE than 3G.

The study shows that LTE is less power efficient than WiFi and 3G for small data transfers but for bulk data transfers LTE is more power efficient than 3G but not Wi-Fi. Because LTE is more efficient than 3G for bulk data transfer then its important to make us of application tools such as Application Resource Optimizer (ARO) (MobiSys11 demo here) in LTE.

LTE is less power efficient than WiFi and 3G, even when DRX was used.

In LTE, the tail timer is the key parameter in determining the trade off between UE energy usage, performance and signalling overhead.

The study identified performance bottlenecks for android applications caused by device processing power, this is detected by monitoring CPU usage of application on the android devices.

Background on Radio Resource Control (RRC) and Discontinuous Reception (DRX) in LTE

Radio Resource Control (RRC) is a signalling protocol between user equipment (UE) and the 3G network (or 4G in this case). Long term evolution (LTE) has two RRC states: connected and idle. The transition from RRC-connected to RRC-idle is made when no data have been received/sent in a time peroid. The transition from RRC-idle to RRC-connection is made when some data is received/sent

Discontinuous Reception (DRX) is a used in mobile communication to conserve power. The UE and the network (in this case LTE) decide on phases when data transfer occurs, outside of these phases the network reciever on the mobile device is turned off thus consuming less energy.

For example. in 802.11 wireless networks, polling is used to control DRX. The mobile device is placed into standby for a set time interval and then a message is sent by the access point to indicate if there is any waiting data, if not then it is placed in standby again.

When LTE is RRC-connected state, then the UE can be in continuous reception, short DRX or long DRX. When LTE is RRC-idle, then the UE is only in DRX mode. Long DRX and short DRX are cycles of the receiver being on and off. The receiver is off for longer in long DRX, which increases delay but reduces emergy consuption. The receiver is on for longer in short DRX, which increases energy consuption but reduces deley. The parameters which dictate the length of time before various transitions, controls the trade-off between battery saving and latency.

Network Measurement
The android application designed to collect test data was called 4GTest and allows the user to switch between 3G, WiFI and LTE. The application made use of M-lab support. Measurement Lab (M-lab) is an distributed server platform for the deployment of internet measurement tools. The server-side tools are open source and the API’s allow researchers to develop client tools such as 4GTest.

When considering RRT for LTE, its important to consider the latency of the wired parts of the path from client to server because the latency of LTE is lower than that of 3G so errors (caused by wired parts) become more notable. To minimize the path from client to server, which is not LTE, the nearest server to the client is always used.

If GPS was not available then IP address was used to locate the client. This translation from IP address to GPS is a rough estimate. The service used for this translation was MaxMind.

To measure RRT and latency variation (difference in latency between connections not packets so its not called Jitter), the application repeatedly established a new TCP connection with the server and measures the delay between SYN and SYN-ACK packet. The median RTT measurements and the variation are reported to central server

To measure peek channel capacity, 4GTest sets up multi-threaded TCP measurements using the 3 nearest servers in M-lab. The throughput test lasts for 20 seconds, the first 5 seconds were ignored due to TCP slow start then the other 15 sec are split into 15 1 sec bins. The average throughput for each bin is calculated and the median of all bins is the measured throughput.

Interestingly, the median is used here instead of average as median reduces the impact of abnormal bins.

To collect packet traces on the android phone, tcpdump was cross-compiled.

To capture CPU usage history, a C program was written to read /proc/stat in the android system.

To understand the impact of packet size on one-way delay, delay was measured for a range of packet sizes and for each packet size, 100 samples were measured.

Power measurements were made using a Monsoon power monitor as power input for the android phone. Phone screen was turned off where possible.

The data set used for analysis is called UMICH and includes full packet traces in TCPdump format including both headers and payloads

The network model simulator takes the binary packet trace files in libpcap format and percessioning is required to collect accurate data.

Application performance 

The sample applications tested where some of the most popular apps. For the browser a simple website and a content-rich website were both tested. The approach taken involved launch the applications and then monitoring upstream, downstream data and CPU usage.

LTE Network characterization

These results are from the public deployment of 4GTest. In the US, the coverage of LTE, WiMAX and WiFi were found by 4GTest to be similar.

The public deployment of 4GTest found that the downlink and uplink throughput were both much higher for LTE than for Wi-FI, WiMAX and 3G technology. High variation in LTE throughput was observed.

For RRT and Jitter, LTE was found to have similar values to WiFi and better values than 3G and WiMAX

One-way delay and impact of packet size
On Wifi, packet size didn’t seem to influence one way delay, in either direction. On LTE, the uplink delay increases as packet size increases.

Modility
The requirements for LTE highlight that the network should be optimized for UE at low mobile speed (0 to 15 km/h) whilst still supporting high mobile speed (15 to 120 km/h).It was observed that in the face of speed changes, RTT remains stable and no significant change in throughput was observed.

Time of Day
Time of day was not found to have significant impact on the observed results .
 

I’m starting to learn Programmer Dvorak

I’ve finally bitten the bullet and decided to learn Programmer Dvorak. Firstly, what on earth is Dvorak ? … Well, Dvorak is a alternative keyboard layout to QWERTY which is designed to make it easier and faster to type, by making the most common phases located near to the base position of your fingers. Programmer Dvorak is a particular “sub layout” of Dvorak which makes it easier to write source code.

Switching to Dvorak in Ubuntu is easy, just change the keyboard layout to “English (Dvorak Programmer). I was told by a friend, this is best not to move you keyboard keys or stick sticker over them, you should instead memories the layout of Dvorak Programmer

TCPtrace – An introduction

What is TCPtrace ?

Wireshark wins over TCPtrace on GUI  

Its a tool designed to analyze the output logs from TCPdump. Previously, in my introduction to TCPdump I highlighted that the output logs created by TCPdump were not plain text and only special programs could interpret them, TCPdump is one of these program, as is Wireshark and TCPtrace.

So TCPtrace takes the output file from TCPdump as an input and it then outputs useful information and graphs.

How do I get TCPtrace ?

I downloaded it from the Ubuntu repositories using the typical ‘sudo apt-get install tcptrace’. If this is not possible you can download it from here.

How do I input a TCPdump file to TCPtrace ?

You can call TCPtrace with a TCPdump file using  ‘tcptrace ‘ where my-file is the name of the file outputted by TCPdump. For example you could do something like:
$ sudo tcpdump -v -i wlan0 -w my_tcpdump_output -c 100
$ tcptrace my_tcpdump_output

The above will run TCPdump and create the output file called “my_tcpdump_output”, this file is then passed as a argument to the TCPtrace tool

How do i interpret the basic TCPtrace output ?

The structure of the output is (in order from the top) :

  • 1st line returns the name of the TCPdump output file that TCPtrace is currently analyzing
  • Then it printed the version of TCPtrace and then this version was last compiled
  • The next line states the number of packets seen and the number of those which were TCP
  • The following line gives the elapsed wallclock time, this is the time TCPtrace took to process the file and it then gives the average number of packets processed by TCPtrace per second
  • The following line gives the trace file elasped time, this is the time between the capture of the first packet and the last packet in the file
  • The sequential lines contain information on each TCP connection
    • First it gives the address and ports of the two machines involved in the connection
    • Then is the label given to this connection by TCPtrace is printed in parenthesis
    • The number proceeding ‘>’ is the number of packets seen in the first host to second host direction
    • The number proceeding ‘<‘ is the number of packets seen in the second host to the first host direction
    • Then the connection is labelled with ‘(complete)’ or ‘(reset)’, with the connection being labelled as complete if SYN and FIN packets were seen

This output is TCPtrace’s brief output. Just like TCPdump, you can stop the translation of IP address to domain names using the ‘-n’ opinion.

When using TCPdump, you can see more detailed output using the ‘-v’ option but with TCPtrace you can see more detailed output using the ‘-l’ option.

When adding options to TCPtrace, you need to ensure the you place the extra options before the name of the input file and after the tool name.

When viewing the output from the long mode (when -l is the option) then all information is labelled. I’m now going to explain each label given in long output (warning .. this might take a while):

Packets and ACKS

  • total packets – number of packets sent in that specific direction
  • ack pkts sent – number of ACKs sent in that direction
  • pure acks sent – number of ACK sent without data and the SYN,FIN&RST not set
  • sack pkts sent – number of selective ACKs sent in that direction
  • dsack pkts sent – number of duplicate selective ACKs sent in that direction
  • max sack blks/ack – maximum number of selective ACK blocks seen in any selective ACK packet

Retransmissions

  • unique bytes sent – total number of bytes sent excluding retransmittions
  • actual data pkts – total number of packet with at least 1 byte of TCP payload
  • actual data bytes – total number of bytes seen including retransmittion
  • rexmt data pkts – total number of packets that where retransmittions
  • rexmt data bytes – total number of bytes of data that where retransmittions

Window scaling / Probing

  • zxnd probe pkts – total number of window probe packets seen
  • zxnd probe bytes – total number of bytes sent in window probe packets
  • outoforder pkts – number of packets that arrived out of order
  • pushed data pkts – number of packets with the PUSH bit set, this means that the buffered data should be sent to the receiving application
  • SYN/FIN pkts sent – number of packets with SYN or FIN bits set

etc… (sorry I hate leaving things half done, but I really wanted to move on, its in my to-do list)

How do I get RTT (Round-Trip-Time) from TCPtrace ?

TCPtrace will generate statistics on RRT when using with the opinions ‘-r’ and ‘-l’. This will give data on RRT including the number of RTT samples found, RTT minimum,RTT maximum, RTT average, RTT standard deviation, RTT from TCP’s hand shake. The same data is then available again for full-sized RTT samples only.

Google Android Development Camp – Day 1

The following are the notes I’ve taken from the lectures and labs at my first day here at Google, London. This is a first draft and they are very brief, taken in quite a rush. The primary reason for my placing them here on my blog so they that they can be used by other people here with me at the camp.

Introduction

The android platform lauched in October 2008, it now has over 400 million devices registered. Currently, more than 1 million devices are registered each day. There are over 600, 000 applications in the Google Play store, this highlights the quality of the development tools but this also means that there is a lot of competition so applications need to be high quantity across the supported devices.

This diagram shows the Android Development Architecture

The main layers that I will be focusing on are the application layer and the application framework. The android platform makes use of Java Modeling Language (JML).

The lastest Android OS is nicknamed Jelly Bean (its 4.1).

The Android Development that takes place here in London includes youtube, Play Videos, Voice Search, Voice IMF and Chrome

Chrome is NOT a port of chromium. It was first released in February 2007. The current Chrome beta is based on chromium18.

The reason that applications looks difference to their web implementations is to make use of different user interaction methods (such as touch) and to work around limitations (such as screen size).

GMS- a set of applications separate from the OS but are communally shipped with the platform.

Environment & Ecosystem

Android is OpenSource, the development is lead by Google, which in-turn works with partners such as Sony. Initially, Google would do releases of new Android Platforms every few months, but they have now reduced it to yearly so that developers have more time to work on each platform. Each release of android is backwards compaterable. All of the phones that can use the Google Play store have passed some compatibility test, set out by Google.
Google Play has no approvable (unlike the Apple Store), in allows in application billing, licence verification and cloud messaging. More information can found develop.android.com/distribute
The applications made by Google such as Contacts and Calendar, make use of the same API that is available to developers.
The components of an application are Activates (UI elements) , Services (non-UI elements), Content Providers (databases of info) and Broadcast Recievers (talking to other applications).
The Intents “link” activities, services and receriver. They can be explicit or implicit. An Intent will consist of Actions, Categories, URI and extras. This allows you to make use of other applications for example, if you wanted to make an barcode scanner then you need to use the camera.
The Manifestio file is were you declare components, declere required features (such as camera) and required permissions. The required features and android versions can then be used to filter Google Play results so that it only show applications that the phone meets the requirements of.
A .apk is an Android application, all of the code of the application is stored in this one file. Each application runs in “Sandbox” and each application has its own userspace/directory that only it has access to.
The Android development tools support C++ as well as Java.
Tips to speed up the AVD: enable GPU acceleration and select x86 image, when using an x86 machine.
The android output logs can be view by logcat or in eclipse using the DDMS pospective.
All builds much be signed with a X.509 certificate
TIP: On the nexus 7, it seems that the default for applications is portrait not auto. this can be corrected by adding android:screenOrientation=”sensor’

UI Design & Development

More information on design for android is available at d.android.com/design.

The primary form of user interaction is touch so you need to consider factors such as the size of the users fingers. The design of the mobile applications must be intuative to a user on the go. The Android OS runs on 1000 difference devices so you need to consider factors like screen size or if the device has a keyboard.

Key Priniciples
– Pictures are faster than words
– Only show what you need to
– Make important things fast

Every OS has a different look and feel. The current system theme is called “Holo” visual language. You can vary holo to get dark (e.g. media apps), light (e.g. productiveity) or light with dark productivty bar.

UI Structure 

The structure of the android UI is (from the top down) the action bar (required), tabs (optional) and contents.

Action Bar

The action bar has 4 elements (from left to right):

  • Application icon & optional up control
  • View control (such as a page title and dropbox) – this woulds a bit like tabs, this shows where you are using the page title and then when you can go from there via the dropbox
  • Action buttons – typical examples include search, share, new, edit, sort
  • The action overflow – an extra dropbox for extra buttons, a typical example is settings

On smaller screens some action buttons get pushed onto overflow.
The action bar is automatically added on modern application and ActionBarSherlock can be used to achieve backwards compatibility.

You can customize the action bar with the .getActionBar().setDisplayoptions() method

Tabs

Tabs are available as part of the ActionBar API and usually can also be switched with gestures

Contents

The layout of the content is defined as a tree consisting of view groups (tree nodes) and views (tree leaves).

The layout of the content is most commonly defined in XML under res/layout

A view is an individual component such as button, text box or radio button. All views are rectanglar.

A view group is an ordered list of views and view groups. View groups can be divided into two categories: layouts and complex view groups. The key layouts are frame, linear, relative and grid. The key complex view groups are list views and scroll views

The action bar is not defined in XML or is includes as the contents.

The xml files defining the layout of a particular activity are located in res/layout. You can also specify the layout for a particular screen size or orientation. For example if you wanted to use a different layout the nexus 7 compatred to a typically android phone when you can put the XML files in layout-large. If there is no particular layout specified in res/layout-large then the layout in res/layout will be used automatically. Other files include res/layout-land and res/layout-large-land

The universal application binary will contain all resources and then the system choose at run time which resource to use.

A similar situation is true of the drawables, for example this is: drawable-xhdip  for extra high dots per pixel.

A really interesting and useful file type of drawables is “9 patch PGN” and it is well worth researching

The res/values/strings.xml file contains all string that will be displayed to the user, the purpose of this is so that the application can be quickly translated to other languages.

The string in this file can be referenced using R.string.hello in Java or @string/hello in XML, where hello is replaced by the name of the string.

You can access an icon, such as the system edit icon using android.R.drawable.ic_menu_edit  in Java.

dip stands for density independent pixel which means that if i create a button that 30 dip wide, then on whatever device the application is run on, then the physical size remains the same. This is useful for example when you want to ensure that a button will always be just large enough for the user to click on.

1 dip = 1 pixel at 160 dpi

The nexus 7, has 213 dpi, has a screen size of 1280 x 800 pixels or 960 x 600 dip.

The key drawable types are Bitmaps (.png), 9-patches (.9png) and state lists (.xml).

Look at the SDK for more information on how to draw 9 patches. 9 patches are density specified versions on an image that can be stretched.

State lines are used to specify then different graphics are used in different situations for example showing one graphic when button is pressed and another graphic for then the button is not pressed.

ASIDE: its vital to always give the user feedback

Styles can be specified in /res/values/styles.xml. With the file starting with