Category Archives: Platforms

Paper Notes on “Tango: Distributed Data Structures over a Shared Log” [SOSP’13]

The following is a paper notes article on “Tango: Distributed Data Structures over a Shared Log” by Balakrishnan et al. from SOSP 2013. The article focus on the main body of the paper and I will cover Tango’s streaming and transaction support in a separate article, sometime in the future.

I have covered this paper before covering its companion paper “CORFU: A Shared Log Design for Flash Clusters” also by Balakrishnan et al. from NSDI 2012. I expect its paper notes article will answer many of the open questions in this article.

Summary

Tango is system for replicating a data structure to provide linearizable semantics and fault tolerance. Tango is framed as system for application metadata, whose requirement include a need for fault tolerance, high availability, fairly strong consistency/ordering requirements.

[quick note on terminology: unlike the usual terminology to describe systems like Raft and VRR, Tango uses the term “client” to refer to what similar systems call a server and “external client” to what similar systems call a client. We shall use the same terminology as Tango. ]

The basics

At its heart, Tango, takes SMR and separates the replication of the log from the hosts running the application. In traditional SMR, each host runs the application itself (an in-memory deterministic state machine) and stores a local copy of the log. With the help of a consensus protocol, the local copy of the log kept upto date and clients are provided with linearizable semantics. In Tango, only the application runs on these host. The log is instead distributed (using chain replication) across an a set of storage nodes (e.g. an SSD cluster). Tango clients do not communicate directly with message passing (as is the case of SMR), instead they interact via the shared log.

SMR is often used with leader driven consensus, this means that only the leader may commit an operation to replicated log and if the leader was to fail the system is unavailable to clients until a new leader is chosen. In contrast, Tango’s approach allows clients to directly replicate commands to the log. The leader is replaced by a dedicated sequencer and the sequencer state is soft so systems can continue to operate (at higher latency) if the sequencer was to fail.

Tango uses a stream abstraction to shard operations by the data structure on which they operate. This is used to clients to efficiently “ignore” operations which do not apply their data structures.

Shared log (aka Corfu)

The shared log (aka Corfu) is composed of clusters of storage nodes. Within each cluster, each storage node is a replica and operates on a read many/write once basis. Global address x maps to cluster (x mod n) and local address (x div n), where n is the number of clusters. Clients read and write to clusters using chain replication, this is also how failures are handled.

The sequencer stores the global address of the log tail. If this fails, it can reconstructed by querying storage nodes for local address of their log tail. The paper also mentions that each cluster also has its own dedicated sequencer, I could not understand when this is used.

Multiple clients writing to one address is resolved safely and Corfu exposes an operation for filling in unused addresses

Application interface

In many classic protocols, the external client must locate a master/coordinator to handle the request on their behalf. In Tango (like some other leaderless systems like EPaxos) any external client can communication with any client. Often SMR uses master leases or a similar mechanism to handle read requests without fully replicating them (unlike write requests) or having to pass them to the master. Corfu supports a check operation so Tango can check (and update if necessary) the local view before applying the update. Transactions are supported with speculation, object version numbers and a commit/abort stage before an up call to application is made

The API for interfacing with Tango seems similar to that of SMR. An application must provide a callback to apply a operation and has access to method to add read or write operations. An application may provide a checkpointing mechanism and may call discard on any log prefix.

Related systems

Alternatives to Tango are systems such as Zookeeper, Raft and Chubby. In the introduction, the authors highlight that such system are not sufficient since they only support specific data structures and/or do not support operations over multiple data structures. Whilst I support this idea, I would argue that in at least some existing systems, operations over multiple data structure can be supported by considering the multiple data structures as one. This allows operations over multiple data structure but comes at a high cost of adding a total ordering between operations when only a small partial ordering is required. Since Tango support streaming, it already has access to a partial ordering on operations instead of just using a total ordering. P-SMR by Parisa Marandi demonstrates the efficiently improvements possible by utilizing this information. Another argument given in the paper is that adopting SMR after the development of an application “often requires a drastic rewrite of the code”.

Evaluation

The experimental evaluation of Tango focuses on measuring throughput and/or latency whilst varying the number of clients and ratio of write to read requests. I would be interested to see some results on the recovery time for various patterns of storage node or sequencer failures. The initial evaluation considers three scenarios: (a) 18 storage nodes and 1 client, (b) 18 storage nodes and 2 clients, (c) 2 or 18 storage nodes and 1 to 18 clients. Generally speaking, the results are very much as you might expect: increasing request load increases request latency, writes place a much high burden on the system than reads and read only clients scale linearly until storage nodes are saturated.

The paper does not mention any formal proof of correctness (only that the sequencer is not required for correctness). Log compaction is supported with the forget call and checkpointing. Dynamic membership support for clients is trivial due to the design of Tango but I would be interested how Corfu and its variant of chain replication handles storage node failures.

It is not fair to directly compare Tango to systems using SMR with a majority quorum consensus algorithm (such as Raft). Tango’s scalability comes (in part) from the sharding of the replication log into clusters. This technique can be applied to SMR (see S-SMR) too. It would be interesting to see how Tango performs with the storage node, application node and sequencer co-located on same the host. However (particularly with current trend towards containers, docker and unikernels) separating systems like Tango into function specific instances/hosts has some significant benefits such as decoupling the number of storage and application hosts or fine gained provisioning for the sequencer compared to the storage/application hosts.

Conclusion

Each new paper that presents a high availability, fault-tolerance systems seems to build upon many of the old concepts (such as Paxos, SMR and timeouts for failure detection), in combination with a few novel ideas. In this case, Tango builds upon chain replication, for replicating log entries and the typical API for SMR. This is first time I have seen a soft state sequencer used in such as system as well as the divide between the storage nodes and application nodes. Overall, I really like this paper and its nice to see some novelty in a space crowded with variants of Paxos + SMR.

Part 3: Running your own DNS Resolver with MirageOS

This article is the third in the “Running your own DNS Resolver with MirageOS” series. In the first part, we used the ocaml-dns library to lookup the hostname corresponding with an IP address using its Dns_resolver_mirage module. In the second part, we wrote a simple DNS server, which serves RRs from a zone file using the Dns_server_mirage module.

Today in the third part, we will combine the above to write a simple DNS resolver, which relays queries to another DNS resolver. Then we will compose this with our simple DNS server from last week, to build a resolver which first looks up queries in the host file and if unsuccessful will relay the query to another DNS resolver.

As always, the complete code for these examples is in ocaml-dns-examples.

3.1 DNS FoRwarder

When writing our simple DNS server, we used a function called serve_with_zonefile in Dns_server_mirage to service incoming DNS queries. Now we are going remove a layer of abstraction and instead use serve_with_processor:

val serve_with_processor: t -> port:int -> processor:(module PROCESSOR) -> unit Lwt.t
val serve_with_zonefile : t -> port:int -> zonefile:string -> unit Lwt.t

Now instead of passing the function a simple string, representing the filename of zonefile, we pass a first class module, satisfying the PROCESSOR signature. We can generate such a module by writing a process and using processor_of_process:

type ip_endpoint = Ipaddr.t * int

type 'a process = src:ip_endpoint -> dst:ip_endpoint -> 'a -> Dns.Query.answer option Lwt.t

module type PROCESSOR = sig
  include Dns.Protocol.SERVER

  (** DNS responder function.
      @param src Server sockaddr
      @param dst Client sockaddr
      @param Query packet
      @return Answer packet
  *)
  val process : context process
end

type 'a processor = (module PROCESSOR with type context = 'a)

val processor_of_process : Dns.Packet.t process -> Dns.Packet.t processor

So given a Dns.Packet.t process, which is a function of type:

src:ip_endpoint -> dst:ip_endpoint -> Dns.Packet.t -> Dns.Query.answer option Lwt.t

We can now service DNS packets. If we assume that myprocess is a function of this type, we can service DNS queries with the following unikernel

open Lwt
open V1_LWT
open Dns
open Dns_server

let port = 53

module Main (C:CONSOLE) (K:KV_RO) (S:STACKV4) = struct

  module U = S.UDPV4
  module DS = Dns_server_mirage.Make(K)(S)

  let myprocess ~src ~dst packet = ...

  let start c k s =
    let server = DS.create s k in
    let processor = ((Dns_server.processor_of_process myprocess) :> (module Dns_server.PROCESSOR)) in 
    DS.serve_with_processor server ~port ~processor
end

Now we will write an implementation of myprocess which will service DNS packets by forwarding them to another DNS resolver and then relaying the response.

Recall from part 1, that you can use the resolve function in Dns_resolver_mirage to do this. All that remains is to wrap invocation of resolve, in a function of type Dns.Packet.t process, which can be done as follows:

 
let process resolver ~src ~dst packet =
      let open Packet in
      match packet.questions with
      | [] -> (* we are not supporting QDCOUNT = 0  *)
          return None 
      | [q] -> 
         DR.resolve (module Dns.Protocol.Client) resolver 
         resolver_addr resolver_port q.q_class q.q_type q.q_name 
          >>= fun result ->
          return (Some (Dns.Query.answer_of_response result))) 
      | _ -> (* we are not supporting QDCOUNT > 1 *)
          return None
3.2 DNS server & forwarder

[this part requires PR 58 on ocaml-dns until it is merged in]

We will extend our DNS forwarded to first check a zonefile, this is achieve with just 3 extra lines:

...
DS.eventual_process_of_zonefiles server [zonefile]
>>= fun process ->
let processor = (processor_of_process (compose process (forwarder resolver)) :> (module Dns_server.PROCESSOR)) in
...

Here we are using compose to use two processes: one called process generated from the zonefile and one called forwarder, from the forwarding code in the last section.

Next time, we will extend our DNS resolver to include a cache.


Part 1: Running your own DNS Resolver with MirageOS

The following is the first part in a step-by-step guide to setting up your own DNS resolver using MirageOS. I will be running this on a low power, low cost ARM device called the Cubieboard 2. Up to date code for each version of the DNS resolver is on Github. This guide assumes some basic experience of lwt and MirageOS, up to the level of the Hello World Tutorial.

Feedback on this article and pull requests to the demo code are welcome.

Part 1.1 – Setting up the cubieboard with MirageOS

Plenty of information on setting up a cubieboard with Xen and MirageOS is available elsewhere, most notability:

For debugging I am a big fan for wireshark. I run a full wireshark sesson on the machine which is connection sharing to my cubieboard network, to check all external traffic.

For this guide, I will always be compiling for Xen ARM backend, with direct network connection via br0 and a static IP for all unikernels. My test network router is configured to give out static IP of the form 192.168.1.x to hosts with the MAC address 00:00:00:00:00:0x. As a result, my config.ml file look like:

open Mirage

let ip_config:ipv4_config = {
  address= Ipaddr.V4.make 192 168 1 2;
  netmask= Ipaddr.V4.make 255 255 255 0;
  gateways= [Ipaddr.V4.make 192 168 1 1];
}

let client =
  foreign "Unikernel.Client" @@ console @-> stackv4 @-> job

let () =
  add_to_ocamlfind_libraries [ "dns.mirage"; ];
  register "dns-client" 
[ client $ default_console $ direct_stackv4_with_static_ipv4 default_console tap0 ip_config]

Since the IP address of the unikernel is 192.168.1.2, before launching the unikernel, I do:

echo "vif = [ 'mac=00:00:00:00:00:02,bridge=br0' ]" >> dns-client.xl

I build unikernel using the usual commands:

mirage configure --xen
make depend; make; make run
# edit file.xl
sudo xl create -c file.xl

Part 1.2 – Getting Started

The following is the complete code for a unikernel which queries a DNS server for a DNS domain and prints to console the IP address returned.

open Lwt
open V1_LWT

let domain = "google.com"
let server = Ipaddr.V4.make 8 8 8 8

module Client (C:CONSOLE) (S:STACKV4) = struct

  module U = S.UDPV4
  module DNS = Dns_resolver_mirage.Make(OS.Time)(S)

  let start c s =
    let t = DNS.create s in
    OS.Time.sleep 2.0 
    >>= fun () ->
    C.log_s c ("Resolving " ^ domain)
    >>= fun () ->
    DNS.gethostbyname t ~server domain
    >>= fun rl ->
    Lwt_list.iter_s
      (fun r ->
         C.log_s c ("Answer " ^ (Ipaddr.to_string r))
      ) rl

end

This unikernel will query a DNS server at 8.8.8.8 (google public DNS resolver) for a domain google.com. Here we are using the simple function, DNS.gethostbyname, with the following type sig:

  val gethostbyname : t ->
    ?server:Ipaddr.V4.t -> ?dns_port:int ->
    ?q_class:Dns.Packet.q_class ->
    ?q_type:Dns.Packet.q_type ->
    string -> Ipaddr.t list Lwt.t

This returns a list of IP’s, which we then iterative over with Lwt_list.iter_s and print to the console.

Part 1.3 – Boot time parameters

Hardcoding the server and domain is far from ideal, instead we will provide them at boot time with Bootvar, the interface for bootvar is below:

type t
(* read boot parameter line and store in assoc list - expected format is "key1=val1 key2=val2" *)
val create: unit -> t Lwt.t

(* get boot parameter *)
val get: t -> string -> string option

(* get boot parameter, throws Not Found exception *)
val get_exn: t -> string -> string

We can now use this to provide domain and server at boot time instead of compile time

let start c s =
    Bootvar.create () >>= fun bootvar ->
    let domain = Bootvar.get_exn bootvar "domain" in
    let server = Ipaddr.V4.of_string_exn (Bootvar.get_exn bootvar "server") in
    ...

Part 1.4 – Using Resolve

Now, a real DNS resolver will need to make many more parameters (any DNS query) and return full DNS responses not just IP address. Thus we need to move on from DNS.hostbyname to using the less abstract resolve function, resolve:

  val resolve :
    (module Dns.Protocol.CLIENT) ->
    t -> Ipaddr.V4.t -> int ->
    Dns.Packet.q_class ->
    Dns.Packet.q_type ->
    Dns.Name.domain_name ->
    Dns.Packet.t Lwt.t 

We can achieve same result of hostbyname as follows:

...
    DNS.resolve (module Dns.Protocol.Client) t server 53 Q_IN Q_A (string_to_domain_name domain)
    >>= fun r ->
    let ips =
    List.fold_left (fun a x ->
      match x.rdata with
      | A ip -> (Ipaddr.V4 ip) :: a
      | _ -> a ) [] r.answers in
...

We are now explicit about parameters such as port, class and type. Note that we have opened the Dns.Name and Dns.Packet.t modules. The return value of resolve is a Dns.Packet.t, we fold over answers in the produce an IPaddr.V4 list as with hostbyname. We can also use the to_string function in Packet to print

I’ve taken a break to do some refactoring work on the ocaml-dns library. In the next post, Part 2, we will expand our code to a DNS stub resolver.


Pyland @ PyCon UK

Alex Bradbury presented Pyland, our new educational programming game for kids at this year’s PyCon UK. Ben Catterall,  Joshua Landau, Ashley Newson and I founded Pyland this summer at the computer lab under the excellent supervision of Alex Bradbury and Robert Mullins. We are now looking to get more people involved in the project, the code is open source and you can follow the projects progress on twitter. Alex’s slides from the presentation are embedded below:

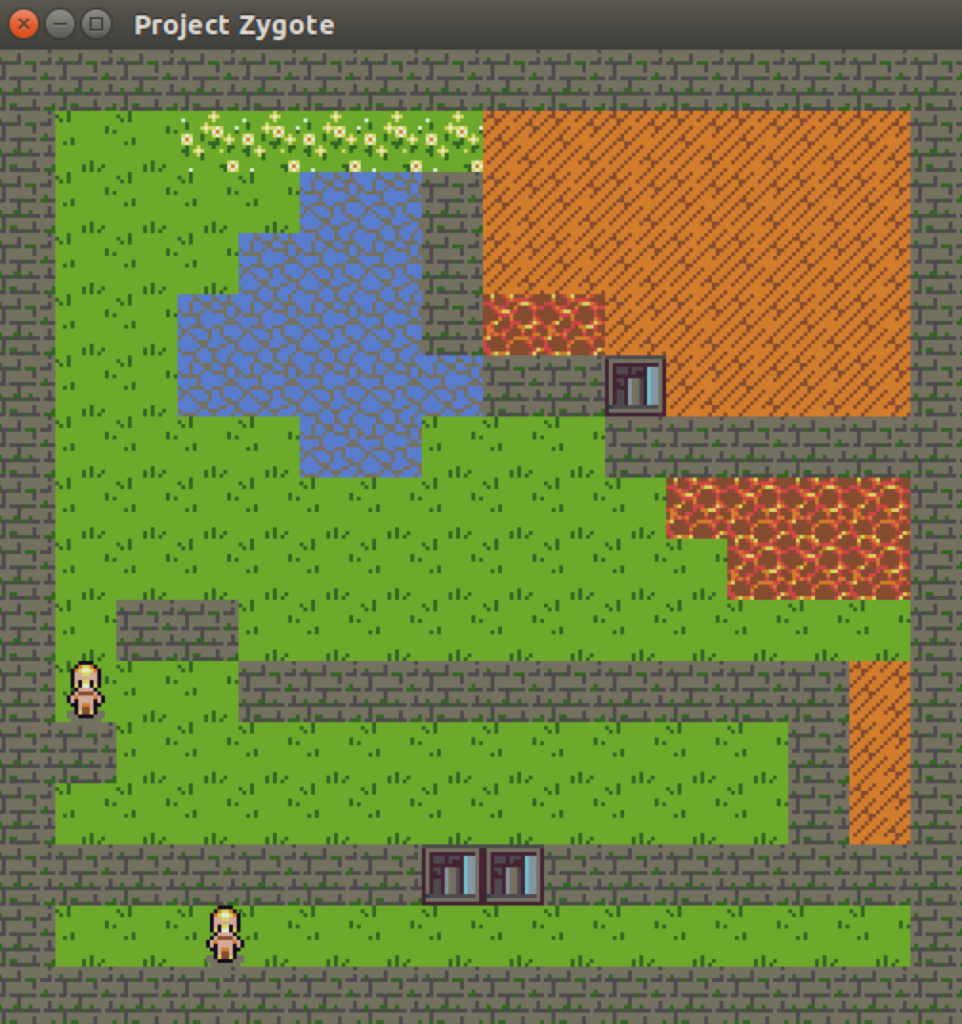
Project Zygote (working title) @ CamJam

Tomorrow we will be demonstrating an early prototype of Zygote (only the working title) at CamJam, the Cambridge based Raspberry Jam, organised by  and . Despite being only a few weeks into the project, we are keen to join the very welcoming Raspberry Pi community in Cambridge and get feedback on our idea as early as possible so they can shape the development of project, instead of simplify being an after through.

If you want to test it out yourself, the code in on Github and the Raspberry Pi compilation instructions are in the README.md. This is a very early version and has many bugs, so be warned.

Screen Shot 2014-07-04 at 16.11.37

Building OpenWRT from Source

The router that I am building OpenWRT for is TL-WDR3500 TL-WDR3600. I will be building Attitude Adjustment, Backfire branch

BASE BUILD

(1) Set up build environment
$ sudo apt-get install subversion build-essential libncurses5-dev zlib1g-dev gawk flex quilt git-core

    $ mkdir ~/OpenWRT
    $ cd OpenWRT
    $ svn co svn://svn.openwrt.org/openwrt/branches/attitude_adjustment
    $ cd attitude_adjustment
(2) Configuring the build
   $ make menuconfig
   Fill in target system and target profile
   Select Base System, check install is minimal and save
(3) Compiling
    $ make make -j
(4) Installing Image (assuming the above is essential)
    Fireware images should be located in /bin, the correct image for flashing over the original firmware end with factory.bin

Quick Guide : Amazon Cloud EC2

The following is a quick guide to setting up an virtual server on Amazon Cloud EC2:

SETUP

1) Login to AWS Management Console using your Amazon account and navigate to EC2

2) In the top right hand corner, check that the location of the servers is the one that you would like to use, I will be using Ireland

3) In the “Getting Started” section of the EC2 dashboard, select Launch instance to create a new virtual server

4) I will be demonstrating the “Classic Wizard”

5) Select the Amazon Machine Image (AMI) that you would like to use, I will be using the Amazon Linux AMI 2012.09, 64bit edition

6) Enter the instance details, I am going to be creating 1 micro instance on EC2 so I’ve not changed any of the options on this page or the following Advanced Instance Options page or Storage Device Configuration page

7) Now you can create tags, using tags for your instances is really useful so I highly recommend it. I’ve set the key and value to “PAWS-router-management-server”

8) Creating a public/private key is vital for using SSH to access your virtual server. Give the private key a sensible name and download it

9) Creating a new security group is highly recommended, otherwise you can use make use the default group. I will be accessing the server using SSH so I’ve opened up port 22 to SHH

10) Review the opinions you have chosen and save

ACCESS

1) If you navigate to the “instances” page, you will now be able to see your newly created instance. Selecting your instance will give you access to more detailed information

2) To access your new instance, open the terminal and locate the private key you downloaded during set up

3) Change the permissions on the key using: $ chmod 400

4) Connect via SSH using: $ ssh -i

More details on the Amazon Linus AMI are available at  http://aws.amazon.com/amazon-linux-ami/ . Its useful to note that there is no root password, you can’t SSH in as root or use su but if you use sudo, no password is required and that the package manager used is yum

OpenWrt & Linksys WRT54GL Router – Meet & Greet

OpenWrt is a firmware for embedded devices used to router traffic. In this case we will be considering the use of OpenWRT in domestic routers such as the test hardware Linksys Wireless-G Broadband Router WRT54GL v1.1.

OpenWrt is Linux based so it included the Linux kernel as well as BusyBox. It has a package manager called opkg (similar to apt in ubuntu).

Before installing OpenWrt on a router, you must enable that the device is OpenWrt compatible, you can do this my ensuring the device is listed here 

HARDWARE SPECIFICATIONS

Before exploring OpenWrt, We are going to take a closer look at the hardware available:

CPU: Broadcom BCM5352 @ 200 MHz
RAM: 16 MB
Flash Memory:  4 MB

QUICK CHECK – to ensure the hardware is what we believe it to be, we can check the prefix of the serial number using the information here 

This hardware is fully supported by OpenWrt, but there have been issues with the limited amount of flash memory:
http://wiki.openwrt.org/toh/linksys/wrt54g#hardware
https://forum.openwrt.org/viewtopic.php?id=28223

The solution to this issues, has also been documented. This is to use OpenWrt 8.09 r14511 (code name “kamikaze”) instead of the most up-to date version OpenWrt 10.03.1-rc6 (code name “backfire”)

PICKING A VERSION

To start with we are going to install OpenWrt in Linksys Web GUI. There are many versions of OpenWrt available, so we need to identify to first version we will try:

  • The OpenWrt version is Kamilaze, due to a bug in backfire and instability of attitude adjustment
  • The recommended version is 8.09 within Kamilaze
  • The CPU is broadcom so the prefix is bcrm
  • For here, i can see the hardware supports both brcm-2.4 and brcm47xx
  • The difference between brcm-2.4 and brcm47xx is explained here 
  • For ease, we will download a image file, this will end with .bin
  • If both JFFS2 and SquashFS is available, use SpuashFS images
  • Look into the version history to determine with version of 8.09 is best and what is different between kamikaze, backfire and attitude adjustment

The image I am going to test is  http://downloads.openwrt.org/kamikaze/8.09/brcm-2.4/openwrt-wrt54g-squashfs.bin

INSTALLATION

Step 1: Download http://downloads.openwrt.org/kamikaze/8.09/brcm-2.4/openwrt-wrt54g-squashfs.bin to my Downloads directory
Step 2: Plug in router to mains and to computer via ethernet (use port 1 not internet port)
Step 3: Direct the browser to http://192.168.1.1 and log in
Step 4: Navigate to Administation > Firmware update, select openwrt-wrt54g-squashfs.bin and update

ALL IS LOOKING WELL 🙂

COMMUNICATION VIA WEB GUI 
Direct the browser to http://192.168.1.1, log in and your presented with the web interface luci

COMMUNICATION VIA TELNET
The router should now be telnet(able) to 192.168.1.1. To test this:
$ telnet 192.168.1.1
This returns the recipe for KAMIKAZE 🙂

Now to ensure that tftp is available to prevent bricking, enter:

  $ nvram set boot_wait=on
  $ nvram set boot_time=10
  $ nvram commit && reboot


 COMMUNICATION VIA SSH

CONFIGURING 

The network configuration is stored in /etc/config/network. The initial contents of this file for our set up is:

The content of the initial configuration file is

 #### VLAN configuration
config switch eth0
option vlan0    “0 1 2 3 5*”
option vlan1    “4 5”

#### Loopback configuration
config interface loopback
option ifname   “lo”
option proto    static
option ipaddr   127.0.0.1
option netmask  255.0.0.0

#### LAN configuration
config interface lan
option type     bridge
option ifname   “eth0.0”
option proto    static
option ipaddr   192.168.1.1
option netmask  255.255.255.0

#### WAN configuration
config interface        wan
option ifname   “eth0.1”
option proto    dhcp

Once we have edited this file, to make the new configuration take after we need to :
$ /etc/init.d/network restart

SWITCH
The switch section of the above configuration file is responsible for making one peoice of hardware, appear as several independent interfaces. The part of the configuration file which specifies the switch characteristics is:

 #### VLAN configuration
config switch eth0
option vlan0    “0 1 2 3 5*”
option vlan1    “4 5”

In the above configuration: The numbers 0-5 represent the port numbers, so VLAN0 includes ports 0 to 5* and VLAN1 includes ports 4 and 5. The * in 5*
indicates the PVID.

As shown in the above diagram, this switch separates the LAN ports and thWAN ports .

INTERFACES
The other statements in the configuration file describe the interfaces. The interfaces are logical networks, for the setting of IP address, routes and other magic.

The 3 interfaces that we have here are named loopback, lan and wan. The physical interfaces associated with these logical interfaces are lo, eth0.0 and eth0.1.


Google Android Development Camp – Day 1

The following are the notes I’ve taken from the lectures and labs at my first day here at Google, London. This is a first draft and they are very brief, taken in quite a rush. The primary reason for my placing them here on my blog so they that they can be used by other people here with me at the camp.

Introduction

The android platform lauched in October 2008, it now has over 400 million devices registered. Currently, more than 1 million devices are registered each day. There are over 600, 000 applications in the Google Play store, this highlights the quality of the development tools but this also means that there is a lot of competition so applications need to be high quantity across the supported devices.

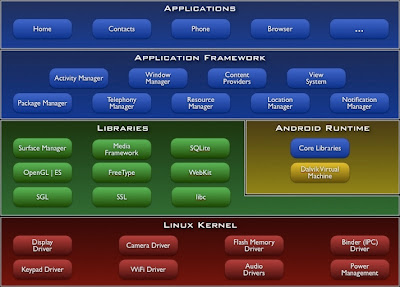
This diagram shows the Android Development Architecture

The main layers that I will be focusing on are the application layer and the application framework. The android platform makes use of Java Modeling Language (JML).

The lastest Android OS is nicknamed Jelly Bean (its 4.1).

The Android Development that takes place here in London includes youtube, Play Videos, Voice Search, Voice IMF and Chrome

Chrome is NOT a port of chromium. It was first released in February 2007. The current Chrome beta is based on chromium18.

The reason that applications looks difference to their web implementations is to make use of different user interaction methods (such as touch) and to work around limitations (such as screen size).

GMS- a set of applications separate from the OS but are communally shipped with the platform.

Environment & Ecosystem

Android is OpenSource, the development is lead by Google, which in-turn works with partners such as Sony. Initially, Google would do releases of new Android Platforms every few months, but they have now reduced it to yearly so that developers have more time to work on each platform. Each release of android is backwards compaterable. All of the phones that can use the Google Play store have passed some compatibility test, set out by Google.
Google Play has no approvable (unlike the Apple Store), in allows in application billing, licence verification and cloud messaging. More information can found develop.android.com/distribute
The applications made by Google such as Contacts and Calendar, make use of the same API that is available to developers.
The components of an application are Activates (UI elements) , Services (non-UI elements), Content Providers (databases of info) and Broadcast Recievers (talking to other applications).
The Intents “link” activities, services and receriver. They can be explicit or implicit. An Intent will consist of Actions, Categories, URI and extras. This allows you to make use of other applications for example, if you wanted to make an barcode scanner then you need to use the camera.
The Manifestio file is were you declare components, declere required features (such as camera) and required permissions. The required features and android versions can then be used to filter Google Play results so that it only show applications that the phone meets the requirements of.
A .apk is an Android application, all of the code of the application is stored in this one file. Each application runs in “Sandbox” and each application has its own userspace/directory that only it has access to.
The Android development tools support C++ as well as Java.
Tips to speed up the AVD: enable GPU acceleration and select x86 image, when using an x86 machine.
The android output logs can be view by logcat or in eclipse using the DDMS pospective.
All builds much be signed with a X.509 certificate
TIP: On the nexus 7, it seems that the default for applications is portrait not auto. this can be corrected by adding android:screenOrientation=”sensor’

UI Design & Development

More information on design for android is available at d.android.com/design.

The primary form of user interaction is touch so you need to consider factors such as the size of the users fingers. The design of the mobile applications must be intuative to a user on the go. The Android OS runs on 1000 difference devices so you need to consider factors like screen size or if the device has a keyboard.

Key Priniciples
– Pictures are faster than words
– Only show what you need to
– Make important things fast

Every OS has a different look and feel. The current system theme is called “Holo” visual language. You can vary holo to get dark (e.g. media apps), light (e.g. productiveity) or light with dark productivty bar.

UI Structure 

The structure of the android UI is (from the top down) the action bar (required), tabs (optional) and contents.

Action Bar

The action bar has 4 elements (from left to right):

  • Application icon & optional up control
  • View control (such as a page title and dropbox) – this woulds a bit like tabs, this shows where you are using the page title and then when you can go from there via the dropbox
  • Action buttons – typical examples include search, share, new, edit, sort
  • The action overflow – an extra dropbox for extra buttons, a typical example is settings

On smaller screens some action buttons get pushed onto overflow.
The action bar is automatically added on modern application and ActionBarSherlock can be used to achieve backwards compatibility.

You can customize the action bar with the .getActionBar().setDisplayoptions() method

Tabs

Tabs are available as part of the ActionBar API and usually can also be switched with gestures

Contents

The layout of the content is defined as a tree consisting of view groups (tree nodes) and views (tree leaves).

The layout of the content is most commonly defined in XML under res/layout

A view is an individual component such as button, text box or radio button. All views are rectanglar.

A view group is an ordered list of views and view groups. View groups can be divided into two categories: layouts and complex view groups. The key layouts are frame, linear, relative and grid. The key complex view groups are list views and scroll views

The action bar is not defined in XML or is includes as the contents.

The xml files defining the layout of a particular activity are located in res/layout. You can also specify the layout for a particular screen size or orientation. For example if you wanted to use a different layout the nexus 7 compatred to a typically android phone when you can put the XML files in layout-large. If there is no particular layout specified in res/layout-large then the layout in res/layout will be used automatically. Other files include res/layout-land and res/layout-large-land

The universal application binary will contain all resources and then the system choose at run time which resource to use.

A similar situation is true of the drawables, for example this is: drawable-xhdip  for extra high dots per pixel.

A really interesting and useful file type of drawables is “9 patch PGN” and it is well worth researching

The res/values/strings.xml file contains all string that will be displayed to the user, the purpose of this is so that the application can be quickly translated to other languages.

The string in this file can be referenced using R.string.hello in Java or @string/hello in XML, where hello is replaced by the name of the string.

You can access an icon, such as the system edit icon using android.R.drawable.ic_menu_edit  in Java.

dip stands for density independent pixel which means that if i create a button that 30 dip wide, then on whatever device the application is run on, then the physical size remains the same. This is useful for example when you want to ensure that a button will always be just large enough for the user to click on.

1 dip = 1 pixel at 160 dpi

The nexus 7, has 213 dpi, has a screen size of 1280 x 800 pixels or 960 x 600 dip.

The key drawable types are Bitmaps (.png), 9-patches (.9png) and state lists (.xml).

Look at the SDK for more information on how to draw 9 patches. 9 patches are density specified versions on an image that can be stretched.

State lines are used to specify then different graphics are used in different situations for example showing one graphic when button is pressed and another graphic for then the button is not pressed.

ASIDE: its vital to always give the user feedback

Styles can be specified in /res/values/styles.xml. With the file starting with

Analysing the Android Demo Code – Pt 5

The following is a look at the code here on GitHub. If you’ve been following my progress so far you will know that I’ve so far managed to run this code, but I am let to take a proper look at the code and how it works.

The top level of the directory contains the following directories/files, typical to an Android project:

  1. directory called /res that contains the launcher icon, the xml file describing the layout, and two further xml files which hold the “values” associated with the application
  2. directory called /src that containing 4 java files LocalBinder.java, SigcommDemoAndroidActivity.java, SigcommDemoAndroidService.java and TestsSignpost.java and a collection of java files for different data views
  3. the AndroidManifest.xml file which highlights that the minimum SDK version is 10
  4. the lint.xml file which contains almost nothing
  5. the pom.xml file, I’m currently not sure what this does
  6. the project.properties file which just re-highlights that the SDK is version 10

I’m now going to take a closer look at the code:

SigcommDemoAndroidActivity.java

Public Methods

  • onCreate(Bundle savedInstanceState) – the method that is called when the application is first started
  • onDestroy() – the method that is called when the application is closed
  • onPause() – the method that is called when the application is paused
  • onClick(View v) – the method that is called when either of the two buttons on the application is pressed, v.getId() is then used to determine which button was pressed
  • updateTimestampArray (float [] array, float newval) – this method shifts all of the values in the array to the left by one position, disregarding the value at index 0 and inserting newval at the last place in the array. There are also minValBandwidth and maxValBandwidth which are updated according
  • updateHistoricValFloat (float [] array, float newval ) – this method shifts all the values in the array to the left by one position, disregarding the value at index 0 and inserting newval at the last place in the array. [Note: the difference between updateTimestampArray and updateHistoricValFloat is that only updateTimestampArray updates the minValBandwidth and maxValBandwidth ]
  • plotLatencyPairs (float [] timestampsDownstream, float [] arrayLatencyDownstream, float[] timestampsUpstream, float[] arrayLatencyUpstream) – this method plots latency pairs
  • plotBandwidthPairs (float [] timestampsDownstream, float [] arrayBandwidthDownstream, float[] timestampsUpstream, float[] arrayBandwidthUpstream) – this method plots bandwidth pairs
  • printVals(int [] array) – this method takes an array of integers, turns them into a string with the values separated by commas and sends them to the INFO log file [Note: API on the log output for android is available here and further information is here]
  • updateHistoricValInt (int [] array, int newval ) – this method shifts all the values in the array to the left by one position, disregarding the value at index 0 and inserting newval at the last place in the array.  [Note: the difference between updateHistoricValInt and updateHistoricValFloat is that updateHistoricValFloat takes a float array and updateHistoricValInt takes a int array]

SigcommDemoAndroidService.java


Public Methods

  • setMainActivity(SigcommDemoAndroidActivity activity, int [] server, int tcpPort) – this method is how SigcommDemoAndroidActivity.java calls this java file. SigcommDemoAndroidActivity.java calls this method when the user click on the start test button on the UI. This method using the data from SigcommDemoAndroidActivity to initialise some of the variables in SigcommDemoAndroidService such as server ip address and port number
  •  stopThread() – this method simply just re-sets the boolean flag testAlive
  •  onBind(Intent arg0) – this method calls the constructor of LocalBinder.java and passes the current instance of SigcommDemoAndroidService to LocalBinder.java
  • onUnbind(Intent intent) – this method seems to do nothing :S
  • onDestroy () – this method calls the onDestroy() on the class Service that SgcommDemoAndroidService inherits from
  • onCreate() – this method calls the onCreate() on the class Service that SgcommDemoAndroidService inherits from and creates a new thread called th
  • callFinalize() – this method calls System.exit(0)
  • notifyActivity (int value, int caseId) – this method refreshs values
  • run () – this method connects to the server and measures the time for packets to be transported between client and server