Category Archives: Android

Google Android Development Camp – Day 1

The following are the notes I’ve taken from the lectures and labs at my first day here at Google, London. This is a first draft and they are very brief, taken in quite a rush. The primary reason for my placing them here on my blog so they that they can be used by other people here with me at the camp.

Introduction

The android platform lauched in October 2008, it now has over 400 million devices registered. Currently, more than 1 million devices are registered each day. There are over 600, 000 applications in the Google Play store, this highlights the quality of the development tools but this also means that there is a lot of competition so applications need to be high quantity across the supported devices.

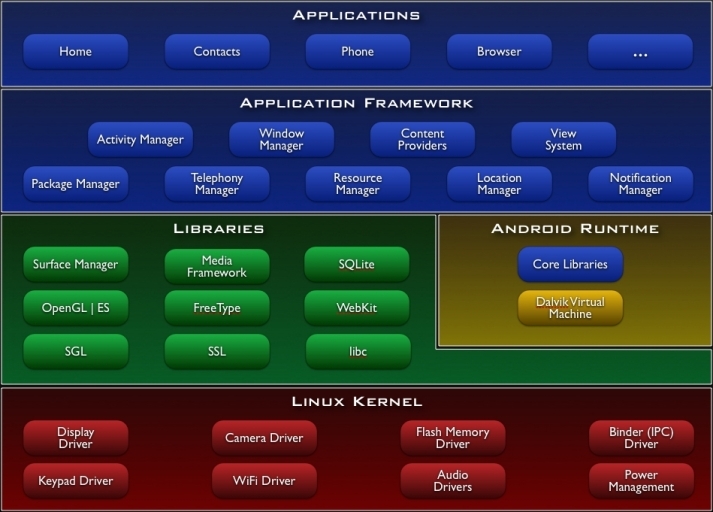
This diagram shows the Android Development Architecture

The main layers that I will be focusing on are the application layer and the application framework. The android platform makes use of Java Modeling Language (JML).

The lastest Android OS is nicknamed Jelly Bean (its 4.1).

The Android Development that takes place here in London includes youtube, Play Videos, Voice Search, Voice IMF and Chrome

Chrome is NOT a port of chromium. It was first released in February 2007. The current Chrome beta is based on chromium18.

The reason that applications looks difference to their web implementations is to make use of different user interaction methods (such as touch) and to work around limitations (such as screen size).

GMS- a set of applications separate from the OS but are communally shipped with the platform.

Environment & Ecosystem

Android is OpenSource, the development is lead by Google, which in-turn works with partners such as Sony. Initially, Google would do releases of new Android Platforms every few months, but they have now reduced it to yearly so that developers have more time to work on each platform. Each release of android is backwards compaterable. All of the phones that can use the Google Play store have passed some compatibility test, set out by Google.
Google Play has no approvable (unlike the Apple Store), in allows in application billing, licence verification and cloud messaging. More information can found develop.android.com/distribute
The applications made by Google such as Contacts and Calendar, make use of the same API that is available to developers.
The components of an application are Activates (UI elements) , Services (non-UI elements), Content Providers (databases of info) and Broadcast Recievers (talking to other applications).
The Intents “link” activities, services and receriver. They can be explicit or implicit. An Intent will consist of Actions, Categories, URI and extras. This allows you to make use of other applications for example, if you wanted to make an barcode scanner then you need to use the camera.
The Manifestio file is were you declare components, declere required features (such as camera) and required permissions. The required features and android versions can then be used to filter Google Play results so that it only show applications that the phone meets the requirements of.
A .apk is an Android application, all of the code of the application is stored in this one file. Each application runs in “Sandbox” and each application has its own userspace/directory that only it has access to.
The Android development tools support C++ as well as Java.
Tips to speed up the AVD: enable GPU acceleration and select x86 image, when using an x86 machine.
The android output logs can be view by logcat or in eclipse using the DDMS pospective.
All builds much be signed with a X.509 certificate
TIP: On the nexus 7, it seems that the default for applications is portrait not auto. this can be corrected by adding android:screenOrientation=”sensor’

UI Design & Development

More information on design for android is available at d.android.com/design.

The primary form of user interaction is touch so you need to consider factors such as the size of the users fingers. The design of the mobile applications must be intuative to a user on the go. The Android OS runs on 1000 difference devices so you need to consider factors like screen size or if the device has a keyboard.

Key Priniciples
– Pictures are faster than words
– Only show what you need to
– Make important things fast

Every OS has a different look and feel. The current system theme is called “Holo” visual language. You can vary holo to get dark (e.g. media apps), light (e.g. productiveity) or light with dark productivty bar.

UI Structure 

The structure of the android UI is (from the top down) the action bar (required), tabs (optional) and contents.

Action Bar

The action bar has 4 elements (from left to right):

  • Application icon & optional up control
  • View control (such as a page title and dropbox) – this woulds a bit like tabs, this shows where you are using the page title and then when you can go from there via the dropbox
  • Action buttons – typical examples include search, share, new, edit, sort
  • The action overflow – an extra dropbox for extra buttons, a typical example is settings

On smaller screens some action buttons get pushed onto overflow.
The action bar is automatically added on modern application and ActionBarSherlock can be used to achieve backwards compatibility.

You can customize the action bar with the .getActionBar().setDisplayoptions() method

Tabs

Tabs are available as part of the ActionBar API and usually can also be switched with gestures

Contents

The layout of the content is defined as a tree consisting of view groups (tree nodes) and views (tree leaves).

The layout of the content is most commonly defined in XML under res/layout

A view is an individual component such as button, text box or radio button. All views are rectanglar.

A view group is an ordered list of views and view groups. View groups can be divided into two categories: layouts and complex view groups. The key layouts are frame, linear, relative and grid. The key complex view groups are list views and scroll views

The action bar is not defined in XML or is includes as the contents.

The xml files defining the layout of a particular activity are located in res/layout. You can also specify the layout for a particular screen size or orientation. For example if you wanted to use a different layout the nexus 7 compatred to a typically android phone when you can put the XML files in layout-large. If there is no particular layout specified in res/layout-large then the layout in res/layout will be used automatically. Other files include res/layout-land and res/layout-large-land

The universal application binary will contain all resources and then the system choose at run time which resource to use.

A similar situation is true of the drawables, for example this is: drawable-xhdip  for extra high dots per pixel.

A really interesting and useful file type of drawables is “9 patch PGN” and it is well worth researching

The res/values/strings.xml file contains all string that will be displayed to the user, the purpose of this is so that the application can be quickly translated to other languages.

The string in this file can be referenced using R.string.hello in Java or @string/hello in XML, where hello is replaced by the name of the string.

You can access an icon, such as the system edit icon using android.R.drawable.ic_menu_edit  in Java.

dip stands for density independent pixel which means that if i create a button that 30 dip wide, then on whatever device the application is run on, then the physical size remains the same. This is useful for example when you want to ensure that a button will always be just large enough for the user to click on.

1 dip = 1 pixel at 160 dpi

The nexus 7, has 213 dpi, has a screen size of 1280 x 800 pixels or 960 x 600 dip.

The key drawable types are Bitmaps (.png), 9-patches (.9png) and state lists (.xml).

Look at the SDK for more information on how to draw 9 patches. 9 patches are density specified versions on an image that can be stretched.

State lines are used to specify then different graphics are used in different situations for example showing one graphic when button is pressed and another graphic for then the button is not pressed.

ASIDE: its vital to always give the user feedback

Styles can be specified in /res/values/styles.xml. With the file starting with

Analysing the Android Demo Code – Pt 5

The following is a look at the code here on GitHub. If you’ve been following my progress so far you will know that I’ve so far managed to run this code, but I am let to take a proper look at the code and how it works.

The top level of the directory contains the following directories/files, typical to an Android project:

  1. directory called /res that contains the launcher icon, the xml file describing the layout, and two further xml files which hold the “values” associated with the application
  2. directory called /src that containing 4 java files LocalBinder.java, SigcommDemoAndroidActivity.java, SigcommDemoAndroidService.java and TestsSignpost.java and a collection of java files for different data views
  3. the AndroidManifest.xml file which highlights that the minimum SDK version is 10
  4. the lint.xml file which contains almost nothing
  5. the pom.xml file, I’m currently not sure what this does
  6. the project.properties file which just re-highlights that the SDK is version 10

I’m now going to take a closer look at the code:

SigcommDemoAndroidActivity.java

Public Methods

  • onCreate(Bundle savedInstanceState) – the method that is called when the application is first started
  • onDestroy() – the method that is called when the application is closed
  • onPause() – the method that is called when the application is paused
  • onClick(View v) – the method that is called when either of the two buttons on the application is pressed, v.getId() is then used to determine which button was pressed
  • updateTimestampArray (float [] array, float newval) – this method shifts all of the values in the array to the left by one position, disregarding the value at index 0 and inserting newval at the last place in the array. There are also minValBandwidth and maxValBandwidth which are updated according
  • updateHistoricValFloat (float [] array, float newval ) – this method shifts all the values in the array to the left by one position, disregarding the value at index 0 and inserting newval at the last place in the array. [Note: the difference between updateTimestampArray and updateHistoricValFloat is that only updateTimestampArray updates the minValBandwidth and maxValBandwidth ]
  • plotLatencyPairs (float [] timestampsDownstream, float [] arrayLatencyDownstream, float[] timestampsUpstream, float[] arrayLatencyUpstream) – this method plots latency pairs
  • plotBandwidthPairs (float [] timestampsDownstream, float [] arrayBandwidthDownstream, float[] timestampsUpstream, float[] arrayBandwidthUpstream) – this method plots bandwidth pairs
  • printVals(int [] array) – this method takes an array of integers, turns them into a string with the values separated by commas and sends them to the INFO log file [Note: API on the log output for android is available here and further information is here]
  • updateHistoricValInt (int [] array, int newval ) – this method shifts all the values in the array to the left by one position, disregarding the value at index 0 and inserting newval at the last place in the array.  [Note: the difference between updateHistoricValInt and updateHistoricValFloat is that updateHistoricValFloat takes a float array and updateHistoricValInt takes a int array]

SigcommDemoAndroidService.java


Public Methods

  • setMainActivity(SigcommDemoAndroidActivity activity, int [] server, int tcpPort) – this method is how SigcommDemoAndroidActivity.java calls this java file. SigcommDemoAndroidActivity.java calls this method when the user click on the start test button on the UI. This method using the data from SigcommDemoAndroidActivity to initialise some of the variables in SigcommDemoAndroidService such as server ip address and port number
  •  stopThread() – this method simply just re-sets the boolean flag testAlive
  •  onBind(Intent arg0) – this method calls the constructor of LocalBinder.java and passes the current instance of SigcommDemoAndroidService to LocalBinder.java
  • onUnbind(Intent intent) – this method seems to do nothing :S
  • onDestroy () – this method calls the onDestroy() on the class Service that SgcommDemoAndroidService inherits from
  • onCreate() – this method calls the onCreate() on the class Service that SgcommDemoAndroidService inherits from and creates a new thread called th
  • callFinalize() – this method calls System.exit(0)
  • notifyActivity (int value, int caseId) – this method refreshs values
  • run () – this method connects to the server and measures the time for packets to be transported between client and server

Iperf on Andriod, a new approach – Pt 4.3

This is blog post number 4, on try to run Iperf on Android, my previous attempts were:

  • Method 1 – getting the Google Play Store on a CyanogenMod phone and downloading the Iperf for Android application
  • Method 2 – SSHing into an Android phone and trying to run Iperf from the command line
  • Method 3 – repeating method 1 & 2 on another Android phone and trying a different application called Aperf
  • Method 4 – trying to run a cross-compiled version of Iperf on the Android phone
  • Potential Method 5 – cross-compile Iperf myself and try to run that version
  • Potential Method 6 – install Linux on android, following instructions here.
  • Potential Method 7 – write my own version of Iperf

THE PLAN

  1. Get to grips with the basics of Android Debug Bridge (adb)
  2. Download the cross compiled Iperf and push it onto SD card
  3. Copy Iperf over the correct location in the system

THE REALITY

1
Android Debug bridge (adb) is a command line tool for communicating with an android device via USB or an emulator instance. adb is not installed in the machine so it must be ran from the correct location, for me this was android-sdk-linux/platform-tools/.

I connect my android phone via USB and run ./adb devices to test that the device is connected. If multiple emulators/device instances are running then I will need to specify with device to use when using adb so for simplicity, I close all running emulators so that I have only my android phone running.

I can install applications from the .apk file using “adb install ” and I can copy files between my device and computer using “adb pull   _location>” and adb push _location> _location>”
2/3
I’ve downloaded Iperf compiled for android and I do the following:
 ./adb push ~/Downloads/iperf / sdcard/   
(* copy iperf from downloads to SDcard *)
./adb shell

(* starts a remote shell on the android device, the command prompt becomes #   *)

mount -o rw,remount /system
(* remount the /system filesystem so that its now read-write *)

cp /sdcard/iperf /system/bin
(*copy the iperf code over to newly remounted /system filesystem *)

mount -o ro,remount /system
(* remount the /system filesystem so that its now read-only *)

Now I try iperf, from the remote shell and IT WORKS !
Yes, that’s right, it works perfectly. This time it was 4th time lucky.

And this right here, is the reason that I’m a computer scientist. For the high, that you get when something finally works and you know that it works because you made it work. Looking back over the past few days, I feel like I’ve learned so much about Android and given the opportunity I would definitely do it all over again but now its time for a coffee.

Another Day, Another Andriod Phone – Pt 4.2

My current aim is to get Iperf running on an Android phone so that I can collect “accurate” network data to compare to the network data produced by Signpost Demo Application that I’m currently trying to test.

The problem is that I can’t get the Iperf for Android application to run on any of the available android phones. I have also tried SSHing into the phone and running Iperf, this also did not work.

I need to get Iperf working on android to collect the data for comparison to data produced by the demo code. The back up plan will be to write my own application to collect the required network data, but I would like to have Iperf working so that I can test my own application.

If anyone has suggestions of tools to collect network data like bandwidth, latency, goodput and jitter, that work on linux and android using a client server architecture, then comment below.

So, I’ve got my hands on yet another android phone, I think this is phone number 6 or something like that. It is a HTC Magic, that is currently not rooted. I boot it up, get it going and download the Iperf for Android application and …

…. it still will not work

So, I do some research and I come across another application that claims to also act as an Iperf cleint, this one is called Aperf. I install it on two different android phones, test and …

…. it still will not work

Repeating the tests, changing Wi-Fi networks and finally it works, The following results are from the Iperf server

[ ID] Interval       Transfer     Bandwidth

[  4] local port 5001 connected with port 58204
[  4]  0.0- 8.9 sec  30.0 KBytes  27.6 Kbits/sec
[  5] local port 5001 connected with port 37831
[  5]  0.0- 6.0 sec  47.0 KBytes  64.3 Kbits/sec
[  4] local port 5001 connected with port 43876
[  4]  0.0- 6.6 sec   132 KBytes   164 Kbits/sec
[  5] local port 5001 connected with port 56253
[  5]  0.0- 6.6 sec   400 KBytes   496 Kbits/sec
[  4] local port 5001 connected with port 55373
[  4]  0.0- 6.5 sec   103 KBytes   131 Kbits/sec
[  5] local port 5001 connected with port 50778
[  5]  0.0- 8.6 sec   697 KBytes   662 Kbits/sec
[  4] local port 5001 connected with port 42511
[  4]  0.0- 5.1 sec  59.0 KBytes  94.3 Kbits/sec
[  5] local port 5001 connected with port 42474
[  5]  0.0- 5.9 sec   386 KBytes   539 Kbits/sec
[  4] local port 5001 connected with port 38663
[  4]  0.0- 8.6 sec  35.0 KBytes  33.3 Kbits/sec
[  5] local port 5001 connected with port 38036
[  5]  0.0- 8.2 sec   332 KBytes   331 Kbits/sec

The information above dose not show the complete picture. This data was collected from the server, in each case the client has only transmitted data for 5 seconds, this means that the bandwidth values above as incorrect. To calculate the correct bandwidth values I need to take amount of data transferred and divide by 5 seconds.

The client dose not seem to output any data except that required to calculate bandwidth. Using UDP instead of TCP dose not seem to allow me to collect any more information.

Ironically the network statistics collected by the Signpost diagnosis android app are latency, goodput and jitter but the only network statistics that I am able to collect is bandwidth.

I do not know where to go forward from here, I need accurate network statistics between a android client and Linux server so I can test the code. I could write my own application to collect the data, but then I will have the same problem again as I need accurate network statistics to check my application is working correctly

Any suggestions ??

Another Failed attempt to set up iperf on Andriod Phone – Demo Pt 4.1

Due to the issues with the Iperf application for android and part of the touch screen on my andriod phone not working properly, I’ve decided that it would be best to set up SSH to remote access on android phone, to make working with the phone easier.

To application that I decided to use to help get my SSH running on as quickly as possible was SSHDroid. This is an excellent application that I would highly recommend. The steps in setting up SSH access where:

  • Install SSHDroid and launch application
  • Change the password from its default which is “admin”
  • Install OpenSSH on your linux computer
  • run ssh root@
  • Enter password when requested

Now I have the command line of the android phone, I downloaded iperf and extracted the contains of the .tar.gz file to the SD card. The next stage in my plan was to use ./configure then make then make install as per usual.

But as ever, thing are never that straight forward.

  • on doing ./configure, I get permission denied
  • on doing sudo ./configure, I get sudo: not found
  • on doing echo $USER, I get root
  • on doing ls -l | grep configure, I get —xrwxr-x

so why will it not work ?

UPDATE:

I’ve managed to deal with the “Permission Denied” error despite having root access and the correct permission by prefixing ./configure with sh. This then fails to compile due to the lack of a C++ compiler

Using Iperf for Collecting Data – Demo Pt 4

Today, I am going to take a look at Iperf and get it running between my server (written in Ocaml and running my laptop) and client (on an android phone). To avoid the issues with IP addresses, I will use the same Wi-Fi network for both the client and server so that both devices are behind the same NAT box and can address each other using the private IP addresses. In this case, (like before) I only need the IP address of the server, which I will get from connection information in Ubuntu 12.04.

Iperf is already installed the server (my laptop) from when I was using Iperf to test the network properties of Tor such as latency, bandwidth and packet-loss. This was before starting this blog. I assume that Iperf was not included in Ubuntu 12.04 and that I got it via “sudo apt-get install iperf” (someone please correct me if I am wrong in this assumption)

Getting on Iperf on the client (an android phone) is a little more complex. Iperf has an android application at the google play store but my android phone does not have an app store as its running CyanogenMod. The paragraph at the top of this wikipedia article explains why there is no build in google play store

The following instruction where taken from this YouTube video. To do this you will need a micro SD card and a USB adaptor

To get the Google Play Store on CyanogenMod:

  1. Download the correct version of gapps from here
  2. Copy the .zip file of gappy onto the micro SD card and put SD back into phone
  3. Reboot in recovery mode
  4. Select flash zip from SD card and then the gapp file
  5. Reboot android phone
  6. Sign-in to your Google account

Then I simply get the Iperf application from the Google Play Store by searching Iperf.

But…
The Iperf application on android don’t seem to work,  The application will load and allow me to enter an Iperf command, in this example I am simply entering -s and click Done, but then nothing happens. If I click the button with “off” on, it momentary turns green and says on before returning to off.
So as per usual its time for some trouble shooting checks:

  • Is the application for my version of andriod ? Yes, the application requirement is 1.5 or up and my version is 2.3.7
  • Is there network connectivity ?  Yes
  • Is the command that I’m test correct ? Yes -s is the example used for screenshots on Google play, also other commands like -c also don’t work
  • Is this a known bug ? nope, source here

I’ve posted the question on stackoverflow here

Whilst I wait and see if anyone can help with my problem. I am going to take a look into the world of Android terminal emulators to see if I could run Iperf this way instead if the android application still fails to work or maybe I can ssh into the phone and run iperf. CyanogenMod comes with a terminal emulator, which I will use for now

Getting Client & Server Talking – Demo Pt 3

Now I have an Android phone running the client and my laptop running the server, its time to get them taking.

A quick inspection of the client code shows the line “public static final int [] IP_ADDR = {128,2362,110,172}; ” I change this to the IP address of my laptop and reload the code onto my android phone.

I launch the server on my laptop, the client on the Android phone and here the troubleshooting begins. Nothing appears to happen on either the client or server so I:

  1. check the network connection on both client and server  ✓
  2. un-install the client application and re-install it ✓
  3. check the IP address of the server is correct ✓
  4. Try running client on emulator ✓ just got the exact same problem

Taking a closer look at the IP address used:

I tried to find out the IP address of the server by visiting here but i thought that I should try to take a more technical approach. Visiting connection information in Ubuntu gives me a different IP address. Now I’m fairly sure that my server is behind a NAT as is my client.

Initally I assume that the different IP address are caused by the NAT, therefore the IP address from the website, is my public IP address (the IP address of the NAT) and the IP address given to my by my OS is the private IP address, that I am referred to by machines also behind the NAT.

This explaination fails to explain why using the IP address from the website didn’t work and the IP address given to me by my OS doesn’t have the normal structure that I would accociate with a private IP address.

So I now repeat my initial test using the different IP address (previously I used the address provided by a website and now I am using the one provided by the OS) and it works on both the android phone and the emulator.

But by use of the word “works” I mean that the server recognises that a client has connected and the GUI on the android client provides graphs showing latency and goodput, it unfortunately doesnt mean that I’ve yet found a good way to extract the data to make a comparision to the data provided by Iperf to test accuracy and reliably, on the assumption that Iperf will always produce accurate results that we can assume to be the true value.

The next useful step will be to continue to explore why this IP address works and the other one doesn’t. As the client and server are now able to connect I can test if this IP address is working only because both client and server are behind the same NAT or is there something more complex going on. Currently both the laptop and android phone are making use of the same Wi-FI network, so the next step in testing if this will work when the client and server are not behind the same NAT is to change the network that either is using.

The plan for testing with would be:

  • move server onto another WiFi network
  • find out new IP address and update client code
  • test if emulator can connect to server, it should do as it used same network connection as the host computer, which in this case is the server
  • test if android phone can connect to server, it should not as its now not behind the same NAT as the server
  • move the android phone onto the other WiFi network
  • test if android phone can connect to server, it should now be able to

As this test is not critical for now, I will move onto Part 4 next week, where I get Iperf collecting the same data between the android client and then compare the data collected

Running the Android Client – Demo Pt 2.1

An update for you on my progress on test the code to measure network performance between an android phone and a computer running a server written in Ocaml. So far, I have run the server and the client separately but not yet got them communicating. As explained in part 2 of this series, I decided to set up Eclipse with ADT Plugin on my desktop after getting some weird errors on my current laptop set up of Eclipse and ADT. The details of the problem are available here on Stackoverflow.com. There has been no clear solution to the problem. Therefore I have had to totally remove my install of Eclipse and ADT, so that I can start all over again.

DreamPlug

I’ve also been distracted the last few days by this piece of new kit, the DreamPlug. We are using it as part of the upcoming Signposts Demo at SIGCOMM in Helsinia.I will write an article on it soon

Finally I’ve fix my Eclipse set-up and I’m now able to load the client code onto the Android phone and run the server on my laptop. Part 3 will be coming very soon.

Also on a personal note, I am 20 today…

Running the Android Client – Demo Pt 2

[ Sorry but this is part 2 in the series, I have completed part 1 but will not be able to upload the article until tomorrow ]

This is the 2nd part of a series on my taking a look at the code here, to test it and then improve it if required. In part 1, I ran the Ocaml server on my laptop. In this part, I run the android client. Tomorrow (Monday), in part 3 I am going to get the client and server communicating. On Tuesday, I will hopefully collect some data that I can then extract in some suitable format. On Wednesday, I hope to run Iperf between my client and server to collect data and extract in some suitable format. On Thursday, I hope to have a day of collecting data using both the GitHub code and Iperf. Finally on Friday, I hope to use a statistics package such as MatLab to compare the data collected and see if there is a statistically significant difference.

Since I have managed to mess up my eclipse/android install (see part 1), this gives me a perfect excuse to set up eclipse with ADT Plugin on my desktop. I’ve also got my hands on a different android phone, since the code that testing was designed for API 10. The phone info is as follows:


Model: HTC Hero Andriod Version: 2.3.7CPU: ARMv6- compatible processor #34Available memory: 190MBMod Version: CyanogenMod-7.2.0-RC1-UNOFFICAL
Build Number: GWK74

THE BIG PLAN

The stages in setting up the Android ADK, Eclipse and loading the code that I’m testing on the Android device (spec above)

  1. Download the Android SDK (Software Development Kit)
  2. The SDK only installs the SDK tools so to install other parts of the SDK, I’ve got to open up the Andriod SDK Manager, this is done by cd’ing into the tools/ directory and executing android SDK
  3. To develop an Andriod app, I need to download the lastest Android SDK Platform-tools and at least on Android platform. The platform that I want is the one associated with Android 2.3.7 and API 10, I’m going to get the related SDK Platform. Documentation and System image.
  4. Download and install the latest Eclipse Classic
  5. Add the source of the ADT Plugin to the Repository in Eclipse and download the Developer Tools in via Eclipse
  6. Specify the location of the Android SDK directory in the Preferences panel of Eclipse
  7. Create a AVD (Android Virtual Device) in Eclipse with target platform 2.3.7 and API 10
  8. Download the code that I’m testing from GitHub
  9. Import the code into Eclpise
  10. Test Code on the AVD
  11. Plug in Android phone and test code on the Andriod phone

AND THEN THE REALITY

1

The Android SDK is avaliable from the Android Developer Site, the package for Linux is called android-sdk_r20-linux.tgz.

The download comes as a .tgz file, this can be extracted using: tar -zxf android-sdk_r20-linux.tgz after using cd to move to the directory that you downloaded the file to.

I’ve found that its useful the learn as your going along, the purpose of the arguments that you are passing to programs, so that you can then easily adjust the arguments in future to suit your needs. Using man tar, explains that -z means filter archive through gzip, -x means extract the filesand -f means that your next going to give the file name.I would highly recommend that when following tutorials with Unix commands that you use man to look up what the executable and its arguments do.

2

As with the last time I installed Android SDK, to launch the Android ADK Manager, I need to enter ./android SDK instead of android SDK. This then appears to work fine, but I would still be interested as to why I didn’t work as expected.

[To clarify This command is entered after you use cd to move into android-sdk-linux/tools]

3

I selected the required packages (that I’ve listed in the plan above) and download them, simple as.

4

(Read this whole paragraph before beginning to download Eclipse) I download Eclipse Classic 4.2 for 32 bits as a .tar.gz file and extract the file (like before using tar -zxf eclipse-SDK-4.2-linux-gtk.tar.gz ). To install Eclipse, I cd into the new eclipse directory, to find no configure file, so my normal method of installing from .tar.gz files, of using ./configure && make && sudo make install will now not work. I little bit of research highlights that installing eclipse its not as straightforward as it might seem and the best approach for integration into Ubuntu is to get it from the software center, though I would prefer to continue to use the command line, I’m happy to leave it for now and return to this point at a later date

5

I start up eclipse, select my workspace and go into Help > Install New Software. I add the ADT Plugin at the URL https://dl-ssl.google.com/android/eclipse/. I then select the Developers Tools and install

6

With a slow connection,

you could be waiting sometime

I restarted Eclipse and configured the new ADT Plugin to link it to the Android SDK. On launching Eclipse, I’m presented with a Welcome to Android wizard (not used in the instruction at https://developer.android.com/sdk/installing/installing-adt.html)

7/8/9

Using the Eclipse GUI setting up a virtual device is straightforward. I navigate to the correct page on GitHub, download the code and extract as already done twice before and then I import the code as an existing Android project into Eclipse.

UNEXPECTED DIGRESSION

On loading the code, that I know should compile, eclipse highlights 2 errors and 13 warnings. As I’m just testing the code today before reviewing it next week. I will ignore the warming but deal with the errors as they prevent me from testing the code. The first error is from the line: import com.google.gson.Gson; I download the Gson project from googlecode and add it as an external libray to the project to overcome this. The second error is from the following line: public void onClick(View v). The error is that: The method onClick(View) must override a superclass method so this can be fixed by removing the above @Override annotation

10

Before I can run the code on the emulator, I create a new andriod project and add the code so far. I then use Run As > Android Application to test the code and it works

11

I put the android phone into USB debug mode, plug it in and run as. Again it works 🙂

“The best part about being a computer scientist is the feeling of satisfaction when something finally works”